Blog

  • hf-data-explorer

    HF Data Explorer (Archived)

    This feature has been archived since it is available natively in Hugging Face now. You can learn more about it here.

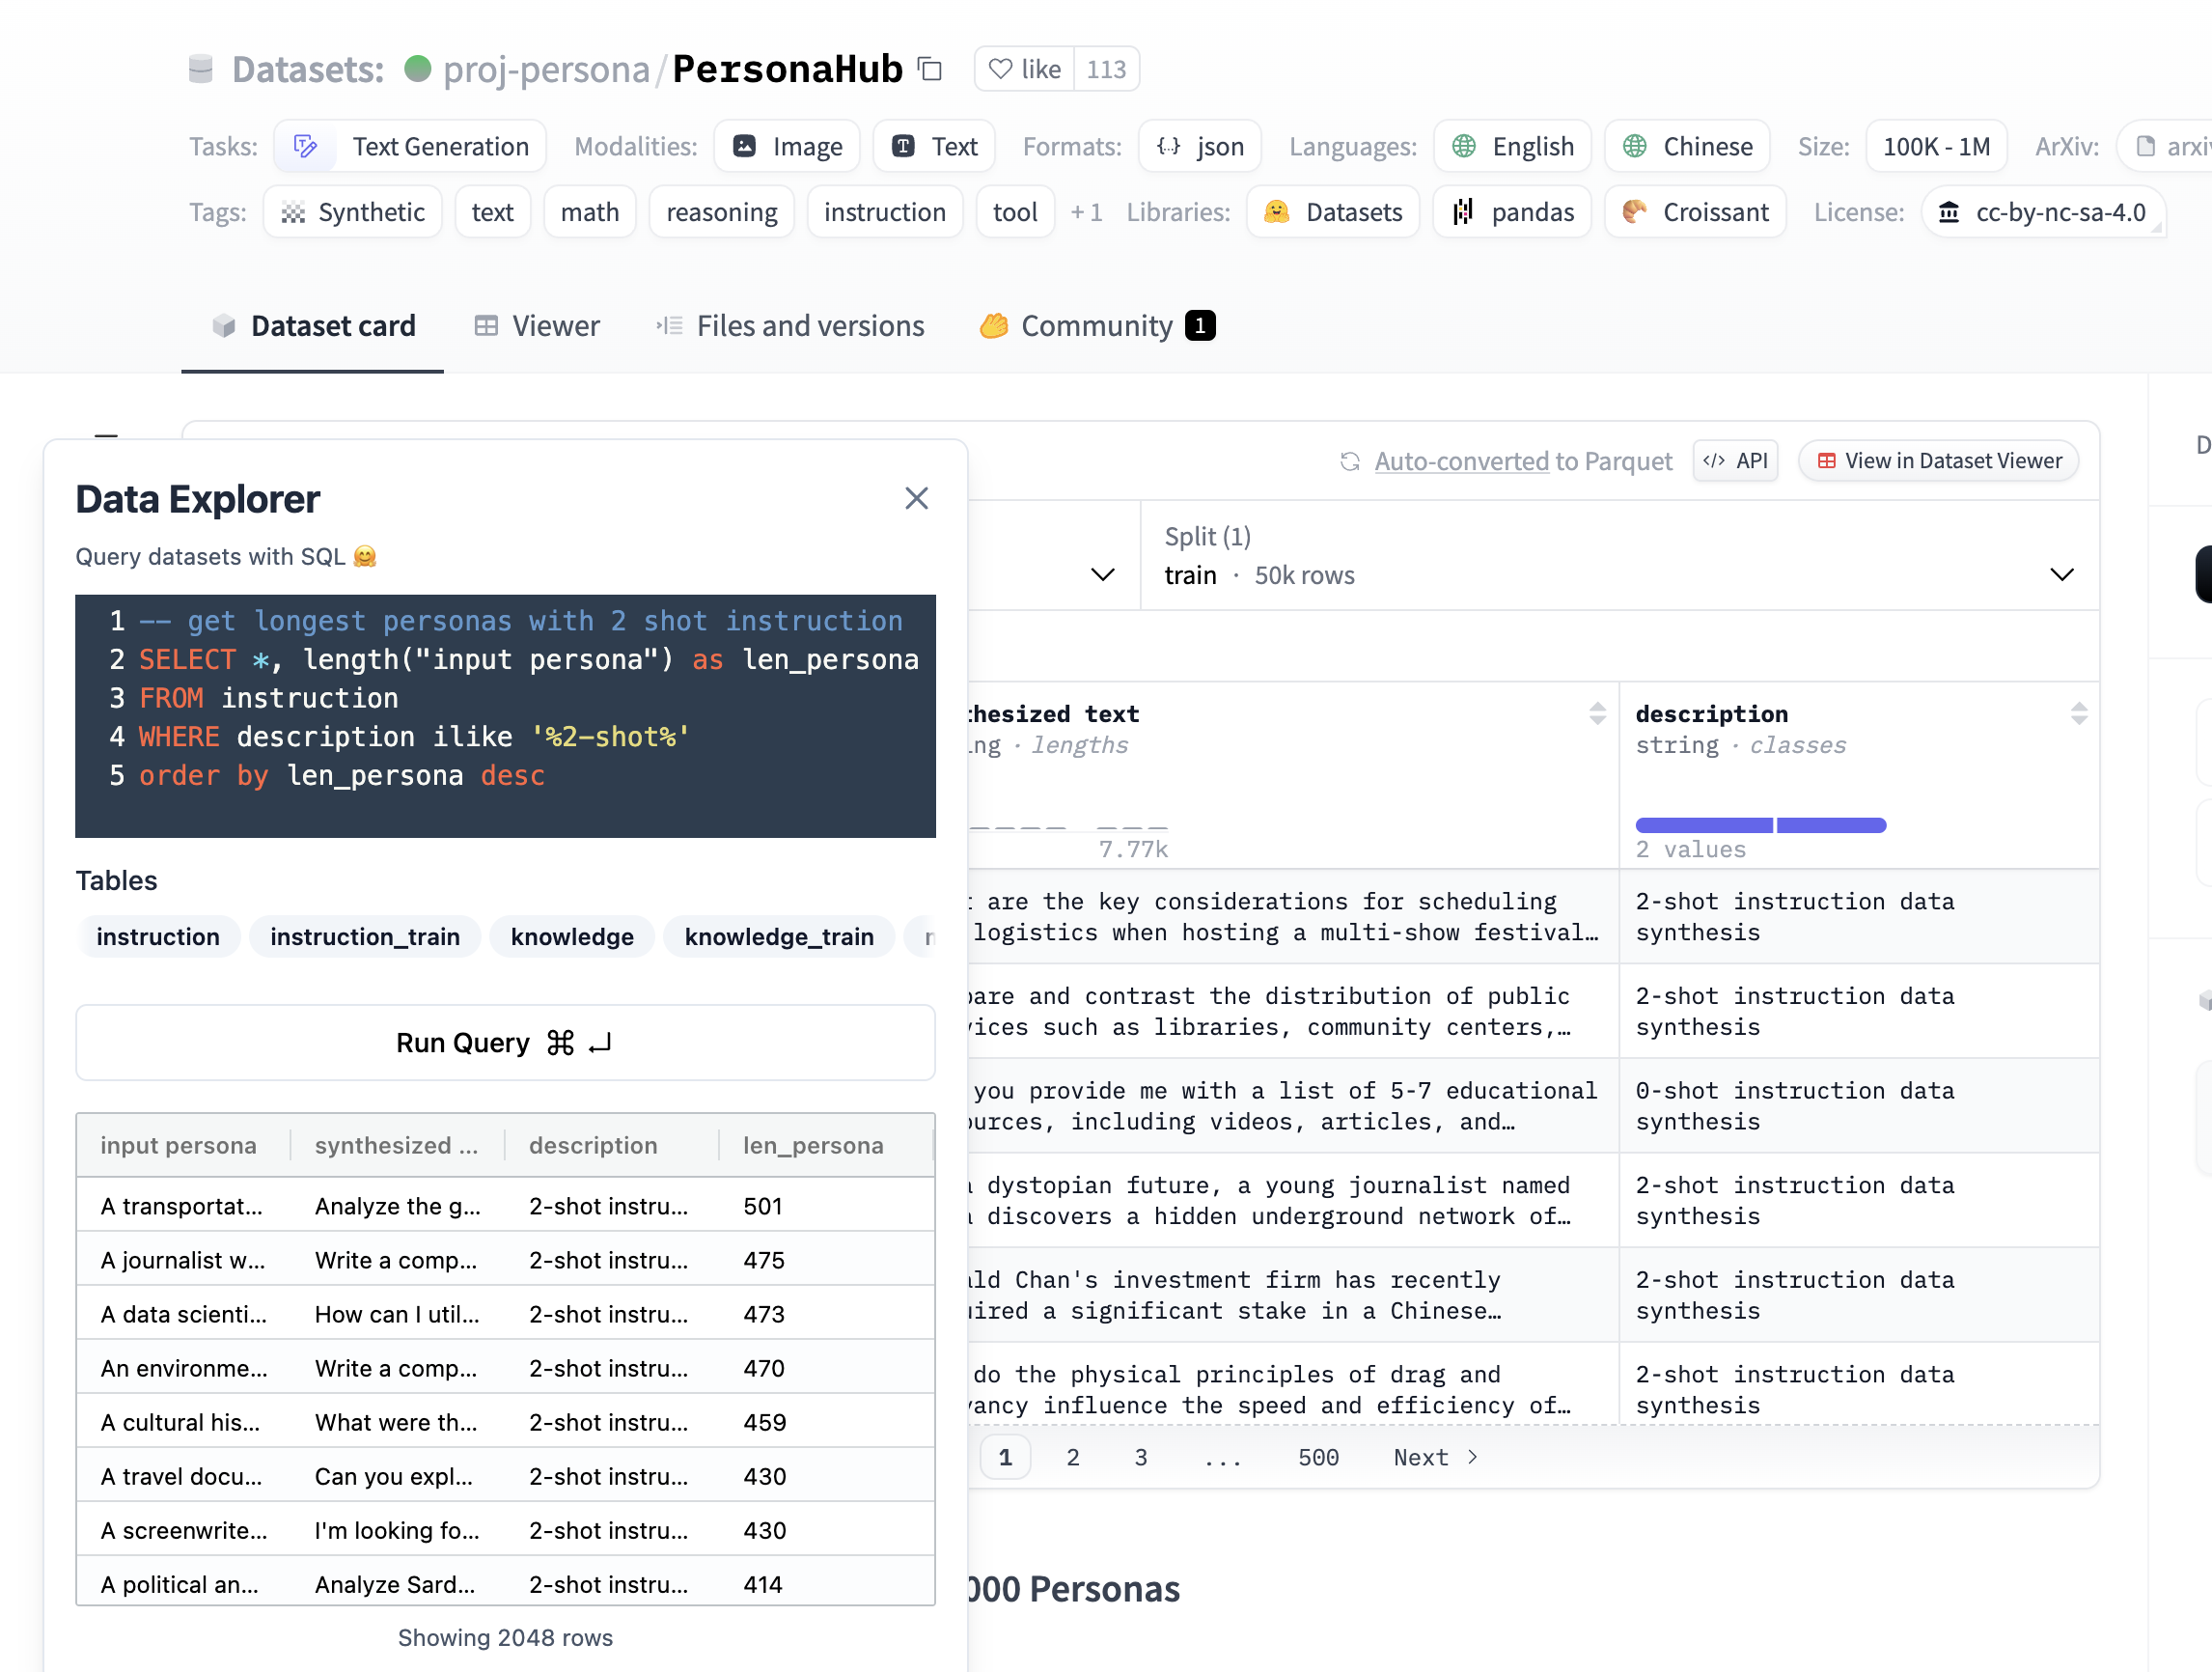
    A Chrome Extension for exploring and query Hugging Face datasets with SQL.

    HF Data Explorer Screenshot

    Getting Started

    Installing

    1. Download the latest release from the Releases page.
    2. Unzip the downloaded file.
    3. Open Google Chrome and navigate to chrome://extensions/.
    4. Enable “Developer mode” by toggling the switch in the top right corner.
    5. Click on “Load unpacked” button.
    6. Select the unzipped folder containing the extension files.
    7. The HF Data Explorer extension should now be installed and visible in your Chrome toolbar.

    Limitations

    DuckDB WASM can only use ~ 4GB of memory (more like 3.4GB with duckdb memory limit). Since DuckDB WASM can’t spill extra data to disk like the other clients, it may not be able to perform very large or advanced queries. However, DuckDB WASM is still very fast, performant, and can work for most workloads.

    Contributing

    This is a Plasmo extension project bootstrapped with plasmo init.

    First, run the development server:

    pnpm dev
    # or
    npm run dev

    Open your browser and load the appropriate development build. For example, if you are developing for the chrome browser, using manifest v3, use: build/chrome-mv3-dev.

    You can start editing the popup by modifying popup.tsx. It should auto-update as you make changes. To add an options page, simply add a options.tsx file to the root of the project, with a react component default exported. Likewise to add a content page, add a content.ts file to the root of the project, importing some module and do some logic, then reload the extension on your browser.

    For further guidance, visit our Documentation

    Making production build

    Run the following:

    pnpm build
    # or
    npm run build

    This should create a production bundle for your extension, ready to be zipped and published to the stores.

    Visit original content creator repository https://github.com/cfahlgren1/hf-data-explorer
  • LittleArduinoProjects

    786 Little Electronic Art Projects

    Latest addition ✨ One Hurts! A most annoying clock – How to turn a cheap quartz clock mechanism into perhaps the most annoying cuckoo clock ever: flashing LEDs, nodding snowman, and a tick-tock chime every second. Made for the 2025 Hackaday One Hertz Challenge.

    LEAP is just my personal collection of electronics projects – usually involving an Arduino or other microprocessor in one way or another. Some are full-blown projects, while many are trivial breadboard experiments, intended to learn and explore something interesting.

    Projects are often inspired by things found wild on the net, or ideas from the many great electronics podcasts and YouTube channels. Feel free to borrow liberally, and if you spot any issues do let me know (or send a PR!). See the individual projects for credits where due.

    For a while I have also included various scale modelling projects here too, but I’ve now split those off into a new repository. Check out LittleModelArt if you are looking for the modelling projects!

    The LEAP Project Index

    The best way to browse the projects is to take a look at the LEAP Catalog. It’s actually a static web site generated directly from the repository. Try it out:

    leap-splash

    Getting Up and Running

    Some projects require additional libraries including FastLED, FlexiTimer2, RadioHead. A set of such libraries are included as submodules of this repository, see the libraries/ page for more information on the included libraries and submodule management.

    For Arduino projects, I have the Arduino IDE sketchbook location (in preferences) set to the root of this repository. This makes all the projects available to me in the IDE, and automatically includes libraries that are linked as git submodules in the libraries/ folder.

    If you don’t have the Arduino IDE setup this way, libraries can be retrieved with git, or you can just install them separately as you would any other library.

    If you clone this repo, also update the submodules to have them available for compilation:

    git submodule update --init
    

    To pull submodule updates later on:

    git submodule foreach git pull
    

    To update a specific library later on, e.g. TextFinder:

    git submodule update --remote libraries/TextFinder
    

    The 10th Anniversary Archive

    I started the LittleArduinoProjects GitHub repository back in 2014. Over the years it accumulated over 2Gb of obsolete commits, and so much git history that it wasn’t even possible to do a git push of the entire repo without resorting to batch tricks.

    Entering the 11th year of the repository, I decided to do a one-time squash of the project history and essentially restart the git history from scratch:

    • https://github.com/tardate/LittleArduinoProjects remains the primary repo
      • but with the git history squashed
        • retains the original first commit as the base, so any clones and forks will share a common root commit
      • I’ve taken the opportunity to rename the working branch from master to main
    • https://github.com/tardate/LittleArduinoProjects-archive-2014-2024 is a snapshot of the repository prior to the squash
      • marked as archived in GitHub, with issues etc disabled
      • retains the full git history in the very unlikely event that anyone needs to refer back to specific change

    What this means in practice:

    • if you are just viewing LittleArduinoProjects on GitHub or the web, there is no impact
    • if you have a clone of the LittleArduinoProjects repository:
      • the simplest is just to throw it away and make a fresh clone of the repo
      • if you have work-in-progress changes on private branches, you will probably want to cherry-pick the changes to a branch based on the new main branch
        • if you need help with that, reach out or post an issue
    • old pull requests (PR) will be based on the old history. Reviving any old PRs will require the changes to be rebased on the new history.

    Hopefully this will help make the LittleArduinoProjects repository fit for use for another 10 years or more..

    Visit original content creator repository https://github.com/tardate/LittleArduinoProjects
  • Controle-de-Pedidos

    Controle de Pedidos

    Projeto de estudo, para a criação de um sistema de controle de vendas/pedidos de uma pizzaria ou similar.


    – Objetivos do Projeto

    Desenvolver uma página online responsiva que realize o básico da gerência de um restaurante, no caso por exemplo, uma pizzaria. Utilizando das melhores tecnologias para alcançar esse objetivo.

    Painel


    – Funcionalidades

    • Gerência de Funcionários
    • Gerência de Produtos
    • Gerência de Clientes
    • Gerência de Pedidos

    – Tecnologias Utilizadas

    • HTML5
    • CSS3
    • JS
    • PHP7
    • MYSQL5
    • Foundation Framework 6

    – Estrutura do Projeto

    O projeto possui a seguinte organização de arquivos.

    • index.html
    • painel.php
    • / admin -> Pasta referente a as funções do administrador.
    • / client -> Pasta referente a as funções do cliente.
    • / stock -> Pasta referente a as funções do estoque/produtos.
    • / css -> Pasta com arquivos de estilo e fontes
    • / img -> Imagens do projeto
    • / js -> Arquivos JavaScript
    • / php -> Arquivos PHP para conecção com o banco de dados
      • / admin -> Arquivos PHP para o administrador intermediarios com o banco de dados
      • / client -> Arquivos PHP para o cliente intermediarios com o banco de dados
      • / stock -> Arquivos PHP para o estoque intermediarios com o banco de dados
    • / screenshots -> Capturas de tela
    • / scriptSQL -> Script de criação do banco de dados do sistema

    Para cada área do painel adminstrativo é feita uma pasta para acomodar os arquivos de cada função, e para a conexão com o banco de dados apara cada função também é criada outra pasta de mesmo nome na pasta PHP. Como por exemplo a pasta admin, com os arquivos de formulários das funções do painel e uma na pasta PHP para agir como intermediário ao banco de dados.


    – Diário de Bordo


    Visit original content creator repository https://github.com/ReinaldoDiasAbreu/Controle-de-Pedidos
  • id-strava-heatmap-extension

    iD Strava Heatmap extension

    This browser extension integrates the Strava Global Heatmap seamlessly into the OpenStreetMap iD editor, enhancing your mapping experience by providing easy access to Strava activity data.


    Installation / Updates

    Available as a Chrome extension and a Firefox add-on.

    Versions

    See the Changelog for details.

    Instructions

    Follow these steps to activate the Strava Heatmap in the iD editor:

    1. Install the extension in your browser and pin it to your toolbar.
    2. Go to https://www.openstreetmap.org/edit?editor=id to open the iD editor.
    3. Press B or click Background Settings, then scroll to the Overlays section.
    4. Select any Strava Heatmap overlay from the list.
    5. Click the red extension icon to log in to Strava. Sign up here if needed: https://www.strava.com/
    6. After logging in, click the green extension icon to set activity type, color, and opacity.
    7. Press Shift+Q to toggle overlay visibility, and Shift+W to toggle data visibility.

    Troubleshooting

    Q: “Click the Strava Heatmap extension icon to log into Strava and enable the heatmap.” — What does this mean?
    A: This message appears if you’re not logged in to Strava and haven’t visited the Strava Global Heatmap. Just click the extension icon to sign in and authorize access.

    Feature and Bug Requests

    Submit issues and feature requests in the Issues section above.

    Background

    Previously, accessing Strava heatmap imagery required a tedious process of extracting Strava website cookies and generating a temporary URL that would expire after a week.

    The JOSM Strava Heatmap Extension simplified this process, but due to the lack of support for custom overlays in the iD editor, users could only add the URL as a custom background.

    With this extension, you can now automatically access all Strava activities as Heatmap overlays, eliminating the need for manual URL management.

    To learn more about using the Strava Heatmap in OpenStreetMap, visit the Strava wiki.

    Support for Other Editors

    Currently, there are no plans to support other editors, as this extension is designed specifically for iD.

    Visit original content creator repository https://github.com/cmoffroad/id-strava-heatmap-extension
  • dsa-for-absolute-dummies

    /$$$$$$$   /$$$$$$   /$$$$$$ 
    | $$__  $$ /$$__  $$ /$$__  $$
    | $$  \ $$| $$  \__/| $$  \ $$
    | $$  | $$|  $$$$$$ | $$$$$$$$
    | $$  | $$ \____  $$| $$__  $$
    | $$  | $$ /$$  \ $$| $$  | $$
    | $$$$$$$/|  $$$$$$/| $$  | $$
    |_______/  \______/ |__/  |__/
    
    /$$$$$$$$ /$$$$$$  /$$$$$$$ 
    | $$_____//$$__  $$| $$__  $$
    | $$     | $$  \ $$| $$  \ $$
    | $$$$$  | $$  | $$| $$$$$$$/
    | $$__/  | $$  | $$| $$__  $$
    | $$     | $$  | $$| $$  \ $$
    | $$     |  $$$$$$/| $$  | $$
    |__/      \______/ |__/  |__/
    
      /$$$$$$  /$$$$$$$   /$$$$$$   /$$$$$$  /$$   /$$ /$$    /$$$$$$$$ /$$$$$$$$
     /$$__  $$| $$__  $$ /$$__  $$ /$$__  $$| $$  | $$| $$   |__  $$__/| $$_____/
    | $$  \ $$| $$  \ $$| $$  \__/| $$  \ $$| $$  | $$| $$      | $$   | $$      
    | $$$$$$$$| $$$$$$$ |  $$$$$$ | $$  | $$| $$  | $$| $$      | $$   | $$$$$   
    | $$__  $$| $$__  $$ \____  $$| $$  | $$| $$  | $$| $$      | $$   | $$__/   
    | $$  | $$| $$  \ $$ /$$  \ $$| $$  | $$| $$  | $$| $$      | $$   | $$      
    | $$  | $$| $$$$$$$/|  $$$$$$/|  $$$$$$/|  $$$$$$/| $$$$$$$$| $$   | $$$$$$$$
    |__/  |__/|_______/  \______/  \______/  \______/ |________/|__/   |________/
    
     /$$$$$$$  /$$   /$$ /$$      /$$ /$$      /$$ /$$$$$$ /$$$$$$$$  /$$$$$$ 
    | $$__  $$| $$  | $$| $$$    /$$$| $$$    /$$$|_  $$_/| $$_____/ /$$__  $$
    | $$  \ $$| $$  | $$| $$$$  /$$$$| $$$$  /$$$$  | $$  | $$      | $$  \__/
    | $$  | $$| $$  | $$| $$ $$/$$ $$| $$ $$/$$ $$  | $$  | $$$$$   |  $$$$$$ 
    | $$  | $$| $$  | $$| $$  $$$| $$| $$  $$$| $$  | $$  | $$__/    \____  $$
    | $$  | $$| $$  | $$| $$\  $ | $$| $$\  $ | $$  | $$  | $$       /$$  \ $$
    | $$$$$$$/|  $$$$$$/| $$ \/  | $$| $$ \/  | $$ /$$$$$$| $$$$$$$$|  $$$$$$/
    |_______/  \______/ |__/     |__/|__/     |__/|______/|________/ \______/

    DSA for Absolute Dummies😵‍💫

    • This is a super simplified examples of the common data structures and algorithms written in easy to read C++ (mostly for now), Python and JS.
    • Reading through this will help you learn about data structures and algorithms and how to use them etc.

    Why should I care to do this?

    • Lack of good courses and good books.
    • It’s simpler for me, I like to learn about this stuff, and every day working on this I am learning new stuff too.
    • Because I need it to refresh my memory if I am stuck on something or whatever..
    • You can use it to refresh your memory too or to learn something new, but easy way (it’s not easy, it’s hard but it will get easier in time).

    But data structures and algorithms are so hard!

    • Yes. Life is hard. I have just one question on that. Do you remember that first day you enter this field of programming and IT in general? I remember that I’ve struggled for 7 days about basic functions (objects) and functionality behind them? Funny? That’s all I am gonna say.

    Where to begin?

    • You can simply start over here wherever you want. Try to go through some Data Structures first.
    • Then, you can go through google and find some easy exercises or websites with coding problems like Codewars or LeetCode.
    • Or you can go buy some book or course and use this if you are stuck on something or you don’t understand some stuff.

    Contributing

    • FEEL FREE TO CONTRIBUTE.
      _____ _      _    _ ______   _____  _    _ __  __ __  __ _____ ______  _____ _ 
     / ____| |    | |  | |  ____| |  __ \| |  | |  \/  |  \/  |_   _|  ____|/ ____| |
    | |  __| |    | |__| | |__    | |  | | |  | | \  / | \  / | | | | |__  | (___ | |
    | | |_ | |    |  __  |  __|   | |  | | |  | | |\/| | |\/| | | | |  __|  \___ \| |
    | |__| | |____| |  | | |      | |__| | |__| | |  | | |  | |_| |_| |____ ____) |_|
     \_____|______|_|  |_|_|      |_____/ \____/|_|  |_|_|  |_|_____|______|_____/(_)

    cc-by-4.0

    Visit original content creator repository https://github.com/radojicic23/dsa-for-absolute-dummies
  • announcement

    Corals Announcement

    Looking to announce a summer sale for your store, or maybe having a maintenance window time you need to notify visitors about it.

    With Laraship Announcement module, you can unlimited popups, configure them to reach all or a specific portion of your site visitors or end users,


    with each Popup (Announcement) you can specify the following options:

    1. Display Items: Including Tile, Description and Featured Image,

    2. Display period: with start and end date.

    3. Show on a specific page or all URLs on the website.

    4. Specify whether to be shown for logged in users only or also website visitors, or even a specific role.

    5. Display action button with the title and URL

    6. You can preview the announcement in the backend.


    Installation

    You can install the package via composer:

    composer require corals/announcement

    Testing

    vendor/bin/phpunit vendor/corals/announcement/tests 

    Questions & Answers

    If you faced any issue you can check our questions center, and you can post your question from the following link Questions & Answers

    Hire Us

    Looking for a professional team to build your success and start driving your business forward. Laraship team ready to start with you Hire Us

    Visit original content creator repository https://github.com/coralsio/announcement
  • MomoColour.github.io

    Massively

    This is Massively, a text-heavy, article-oriented design built around a huge background
    image.

    See a preview of the Massively Jekyll Theme here: https://iwiedenm.github.io/jekyll-theme-massively/.
    Massively was originally designed by HTML5UP and Jekyll was integrated by JekyllUp: Jekyll Themes

    How to Use This Theme

    Jekyll consumes themes in two flavors; gem-based or spread across multiple folders
    in the site source. This port is of the second type. Concretely, it means that you
    can simply grab the zip or clone this repository, run bundle install
    in the new directory and finally bundle exec jekyll serve.
    You can now access your brand-new Jekyll site on http://127.0.0.1:4000/.
    Enjoy!

    If you’re completely new to Jekyll, check out it’s documentation first.
    It’s not too hard, we promise!

    Features

    Slapform.com Integration

    Slapform is supported out of the box! Just add your email to _config.yml and test the form.
    Every time one of your visitors submits the form, you’ll get an email straight to your inbox containing the submission so you can get back to them right away. Slapform is very extendable, including AJAX submissions, webhooks, and more.

    Auto-Generating Sitemap

    The sitemap is auto generated! Just simply change the sitemap variable in front matter of each page. It looks like so…

    sitemap:
      priority: 0.7
      lastmod: 2017-11-02
      changefreq: weekly
    

    Credits

    Original README from HTML5 UP

    Massively by HTML5 UP
    html5up.net | @ajlkn
    Free for personal and commercial use under the CCA 3.0 license (html5up.net/license)
    
    
    This is Massively, a text-heavy, article-oriented design built around a huge background
    image (with a new parallax implementation I'm testing) and scroll effects (powered by
    Scrollex). A *slight* departure from all the one-pagers I've been doing lately, but one
    that fulfills a few user requests and makes use of some new techniques I've been wanting
    to try out. Enjoy it :)
    
    Demo images* courtesy of Unsplash, a radtastic collection of CC0 (public domain) images
    you can use for pretty much whatever.
    
    (* = not included)
    
    AJ
    aj@lkn.io | @ajlkn
    
    
    Credits:
    
    	Demo Images:
    		Unsplash (unsplash.com)
    
    	Icons:
    		Font Awesome (fortawesome.github.com/Font-Awesome)
    
    	Other:
    		jQuery (jquery.com)
    		Misc. Sass functions (@HugoGiraudel)
    		Skel (skel.io)
    		Scrollex (github.com/ajlkn/jquery.scrollex)
    

    Visit original content creator repository
    https://github.com/jb88001199/MomoColour.github.io

  • sbt-ssh-git-proto-deployment-poc

    sbt-ssh-git-proto-deployment-PoC

    This is a Proof of Concept project that demonstrates how to compile protobuf file
    that depends on another external protobuf file that lives in another git repository.

    1. Requirements:

    1. sbt
    2. sbt-protoc plugin to compile .proto files to .java .scala classes
    3. SSH key (in ~/.ssh/) to access private git repository

    2. Set build.sbt

    • If you need to reference a sbt sub-project from the github repository:

      lazy val sbtProjectFromOtherGitRepo = ProjectRef(
        build = uri("ssh://git@github.com/<user>/<repo>.git#<branch|commit|tag>"),
        project = "sub-project"
      )
    • Else just specify github repository:

      lazy val projectFromOtherGitRepo = RootProject(
        build = uri("ssh://git@github.com/<user>/<repo>.git#<branch|commit|tag>")
      )

    Dependency projects will be cloned/checkouted to: ~/.sbt/<sbt version>/staging/<sha>/<repo>/

    • Then using sbt-protoc specify location of .proto files from project dependency:

      PB.protoSources in Compile ++= Seq(
        baseDirectory.in(projectFromOtherGitRepo).value / "path/to/folder/where/protos/are"
      )

    3. Run:

    1. git clone git@github.com:fpopic/sbt-ssh-git-proto-deployment-poc.git
    2. cd sbt-ssh-git-proto-deployment-poc
    3. sbt
    4. compile

    4. Notes:

    External projects that the current project depends on (RootProject) are not getting updated using sbt update command after they have been changed in git,
    (that’s reason why it’s always better to hardcode “immutable” commit/tag version of the dependency than just specifying the repository name), so if a dependend project changes sbt won’t reupdate the source code of the dependency

    This PoC is made for CI automatization (Jenkins) for deploying proto files to maven repository (every time cloning from scratch)

    Visit original content creator repository
    https://github.com/fpopic/sbt-ssh-git-proto-deployment-poc

  • rated-ranking-evaluator

    RRE

    Rated Ranking Evaluator

    The Rated Ranking Evaluator (RRE) is a search quality evaluation tool which, as the name suggests, evaluates the quality of results coming from a search infrastructure.

    Links

    At the moment Apache Solr and Elasticsearch are supported (see the documentation for supported versions).

    The following picture illustrates the RRE ecosystem:

    RRE Ecosystem

    As you can see, there are a lot modules already in place and planned (those with the dashed border)

    • a core, that is the central library which is in charge to produce the evaluation results
    • a search-platform API: for abstracting (and binding) the underlying search platform
    • a set of search-platform bindings: as said above, at the moment we have two available bindings (Apache Solr and Elasticsearch)
    • an Apache Maven plugin for each available search platform binding: which allows to inject RRE into a Maven-based build system
    • an Apache Maven reporting plugin: for producing evaluation reports in a human-readable format (e.g. PDF, excel), useful for targeting non-technical users
    • an RRE Server: a simple web-based control panel where evaluation results are updated in realtime after each build cycle.

    RRE Console

    The whole system has been built as a framework where metrics can be configured/activated and even plugged-in (of course, this option requires some development) The metrics that are part of the current RRE release are:

    • Precision: the fraction of retrieved documents that are relevant.
    • Recall: the fraction of relevant documents that are retrieved.
    • Precision at 1: this metric indicates if the first top result in the list is relevant or not.
    • Precision at 2: same as above but it consider the first two results.
    • Precision at 3: same as above but it consider the first three results.
    • Precision at 10: this metric measures the number of relevant results in the top 10 search results.
    • Reciprocal Rank: it is the multiplicative inverse of the rank of the first “correct” answer: 1 for first place, 1/2 for second place, 1/3 for third and so on.
    • Expected Reciprocal Rank (ERR) An extension of Reciprocal Rank with graded relevance, measures the expected reciprocal length of time that the user will take to find a relevant document.
    • Average Precision: the area under the precision-recall curve.
    • NDCG at 10: Normalized Discounted Cumulative Gain at 10; see: https://en.wikipedia.org/w/index.php?title=Discounted_cumulative_gain&section=4#Normalized_DCG
    • F-Measure: it measures the effectiveness of retrieval with respect to a user who attaches β times as much importance to recall as precision. RRE provides the three most popular F-Measure instances: F0.5, F1 and F2

    On top of those “leaf” metrics, which are computed at query level, RRE provides a rich nested data model, where the same metric can be aggregated at several levels. For example, queries are grouped in Query Groups and Query Groups are grouped in Topics. That means the same metrics listed above are also available at upper levels using the arithmetic mean as aggregation criteria. As a consequence of that, RRE provides also the following metrics:

    • Mean Average Precision: the mean of the average precisions computed at query level.
    • Mean Reciprocal Rank: the average of the reciprocal ranks computed at query level.
    • all other metrics listed above aggregated by their arithmetic mean.

    One the most important things you can see in the screenshot above is that RRE is able to keep track (and to make comparisons) between several versions of the system under evaluation.

    It encourages an incremental/iterative/immutable approach when developing and evolving a search system: assuming you’re starting from version 1.0, when you apply some relevant change to your configuration, instead of changing that version, is better to clone it and apply the changes to the new version (let’s call it 1.1).

    In this way, when the system build happens, RRE will compute everything explained above (i.e. the metrics) for each available version.

    In addition, it will provide the delta/trend between subsequent versions, so you can immediately get the overall direction where the system is going, in terms of relevance improvements.

    delta

    Visit original content creator repository https://github.com/SeaseLtd/rated-ranking-evaluator