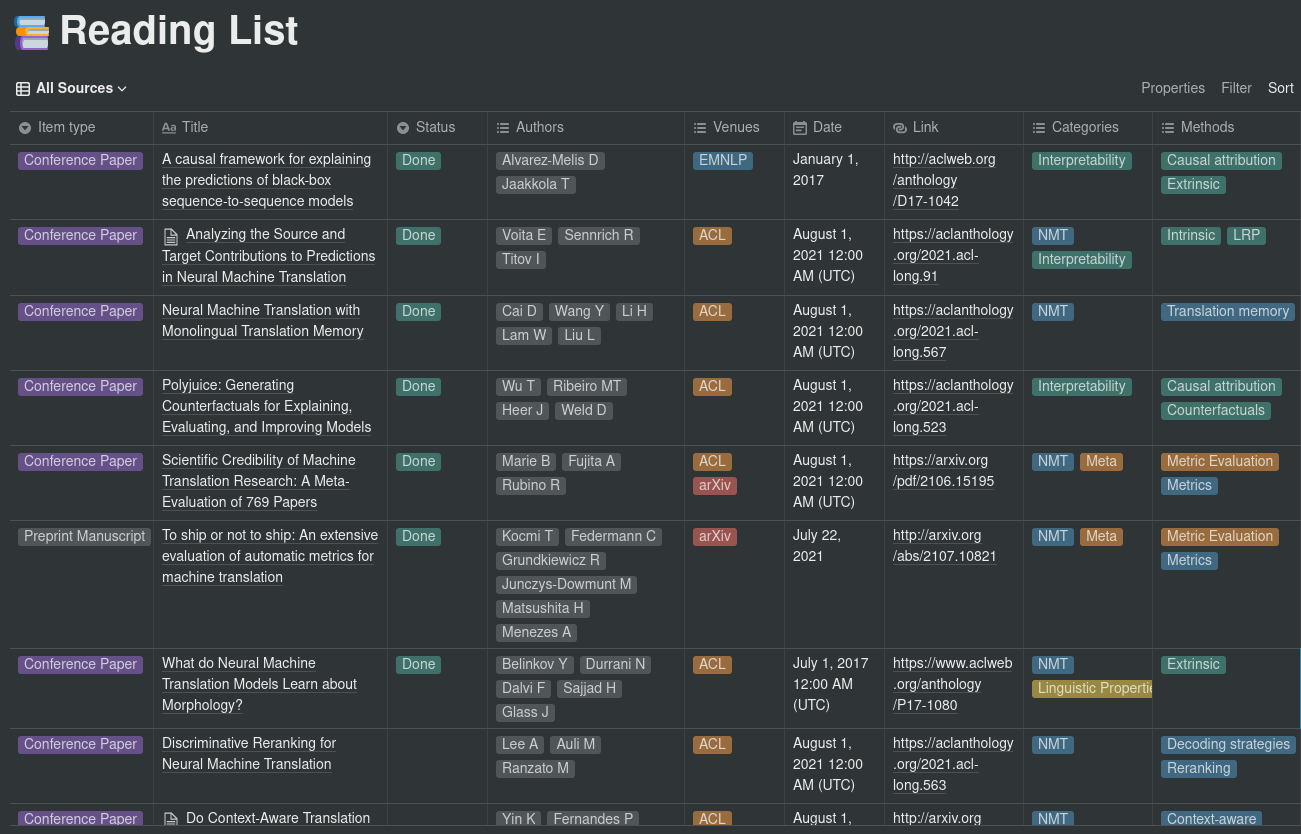
This repository provides a simple integration between Paperpile and Notion using the new Notion API. The purpose is to make it easy to periodically sync a list of papers in Paperpile to a Notion database.
This is a work in progress, and is currently intended for personal use only (no support, no warranty, no liability, etc.).
New: The WIP script download_paperpile_folder.py provides an automated way to download a folder from a Paperpile account. This script uses Chromium and Selenium, so the chrome drivers must be placed under the path to make it work. Check the args for more information.
Installation
Simply clone the repo locally and install the dependencies, preferably in a virtualenv:
To run the script, you will need the following things:
A CSV file exported from Paperpile containing the list of papers and their metadata. data.csv is an example of an exported CSV. For now, this needs to be manually downloaded and moved to this folder since Paperpile does not provide any API for exporting data.
A configuration file to map categories, journals and conferences to their acronyms. config.yaml is an example of a configuration file containing major AI and NLP conferences and journals.
A database id for the Notion database you want to sync to. To retrieve the database id, follow the directions provided here. The current structure for the database must contain at least the following columns:
Item type ( select ): Corresponds to the Item type field in the Paperpile export (e.g. Conference Paper, Journal Article, etc.).
Title ( title ): The title of the paper.
Status ( select ): Set to Done when the paper was read, empty otherwise. Can take other values. Managed by using a “Read” and a “To Read” folder inside Papepile.
Authors ( multi_select ): The paper’s authors. Corresponds to the Authors field in the Paperpile export, with only lastnames and first letter of firstnames.
Venues ( multi_select ): The venues in which the paper was published. Based on the config sections for mapping names to acronyms. Multiselect to specify e.g. conference + arXiv.
Date ( date ): The date the paper was published.
Link ( url ): Link to the paper. If multiple links are available, arXiv links are preferred.
Categories ( multi_select ): The categories the paper belongs to. Define the macro-fields to which the paper belongs. These are extracted from the labels that were assigned to the paper on Paperpile.
Methods ( multi_select ): The methods and aspects investigated in the paper. Can be whatever, from architectures (e.g. CNN, Transformer) to sub-topics. On Paperpile, these correspond to labels having the following format: category_shortname - method_name (e.g. Probing tasks for interpretability research could be INT - Probing). Refer to the CSV file for an example.
A Notion API key. To retrieve the API key, follow the directions provided in the Notion API Getting Started. You will also need to add permission for the integration on the database from the previous point.
Usage
Once everything is in place, simply run the script as:
LLSpy is a python library to facilitate lattice light sheet data
processing. It extends the cudaDeconv binary created in the Betzig lab
at Janelia Research Campus, adding features that auto-detect
experimental parameters from the data folder structure and metadata
(minimizing user input), auto-choose OTFs, perform image corrections and
manipulations, and facilitate file handling. Full(er) documentation
available at http://llspy.readthedocs.io/
There are three ways to use LLSpy:
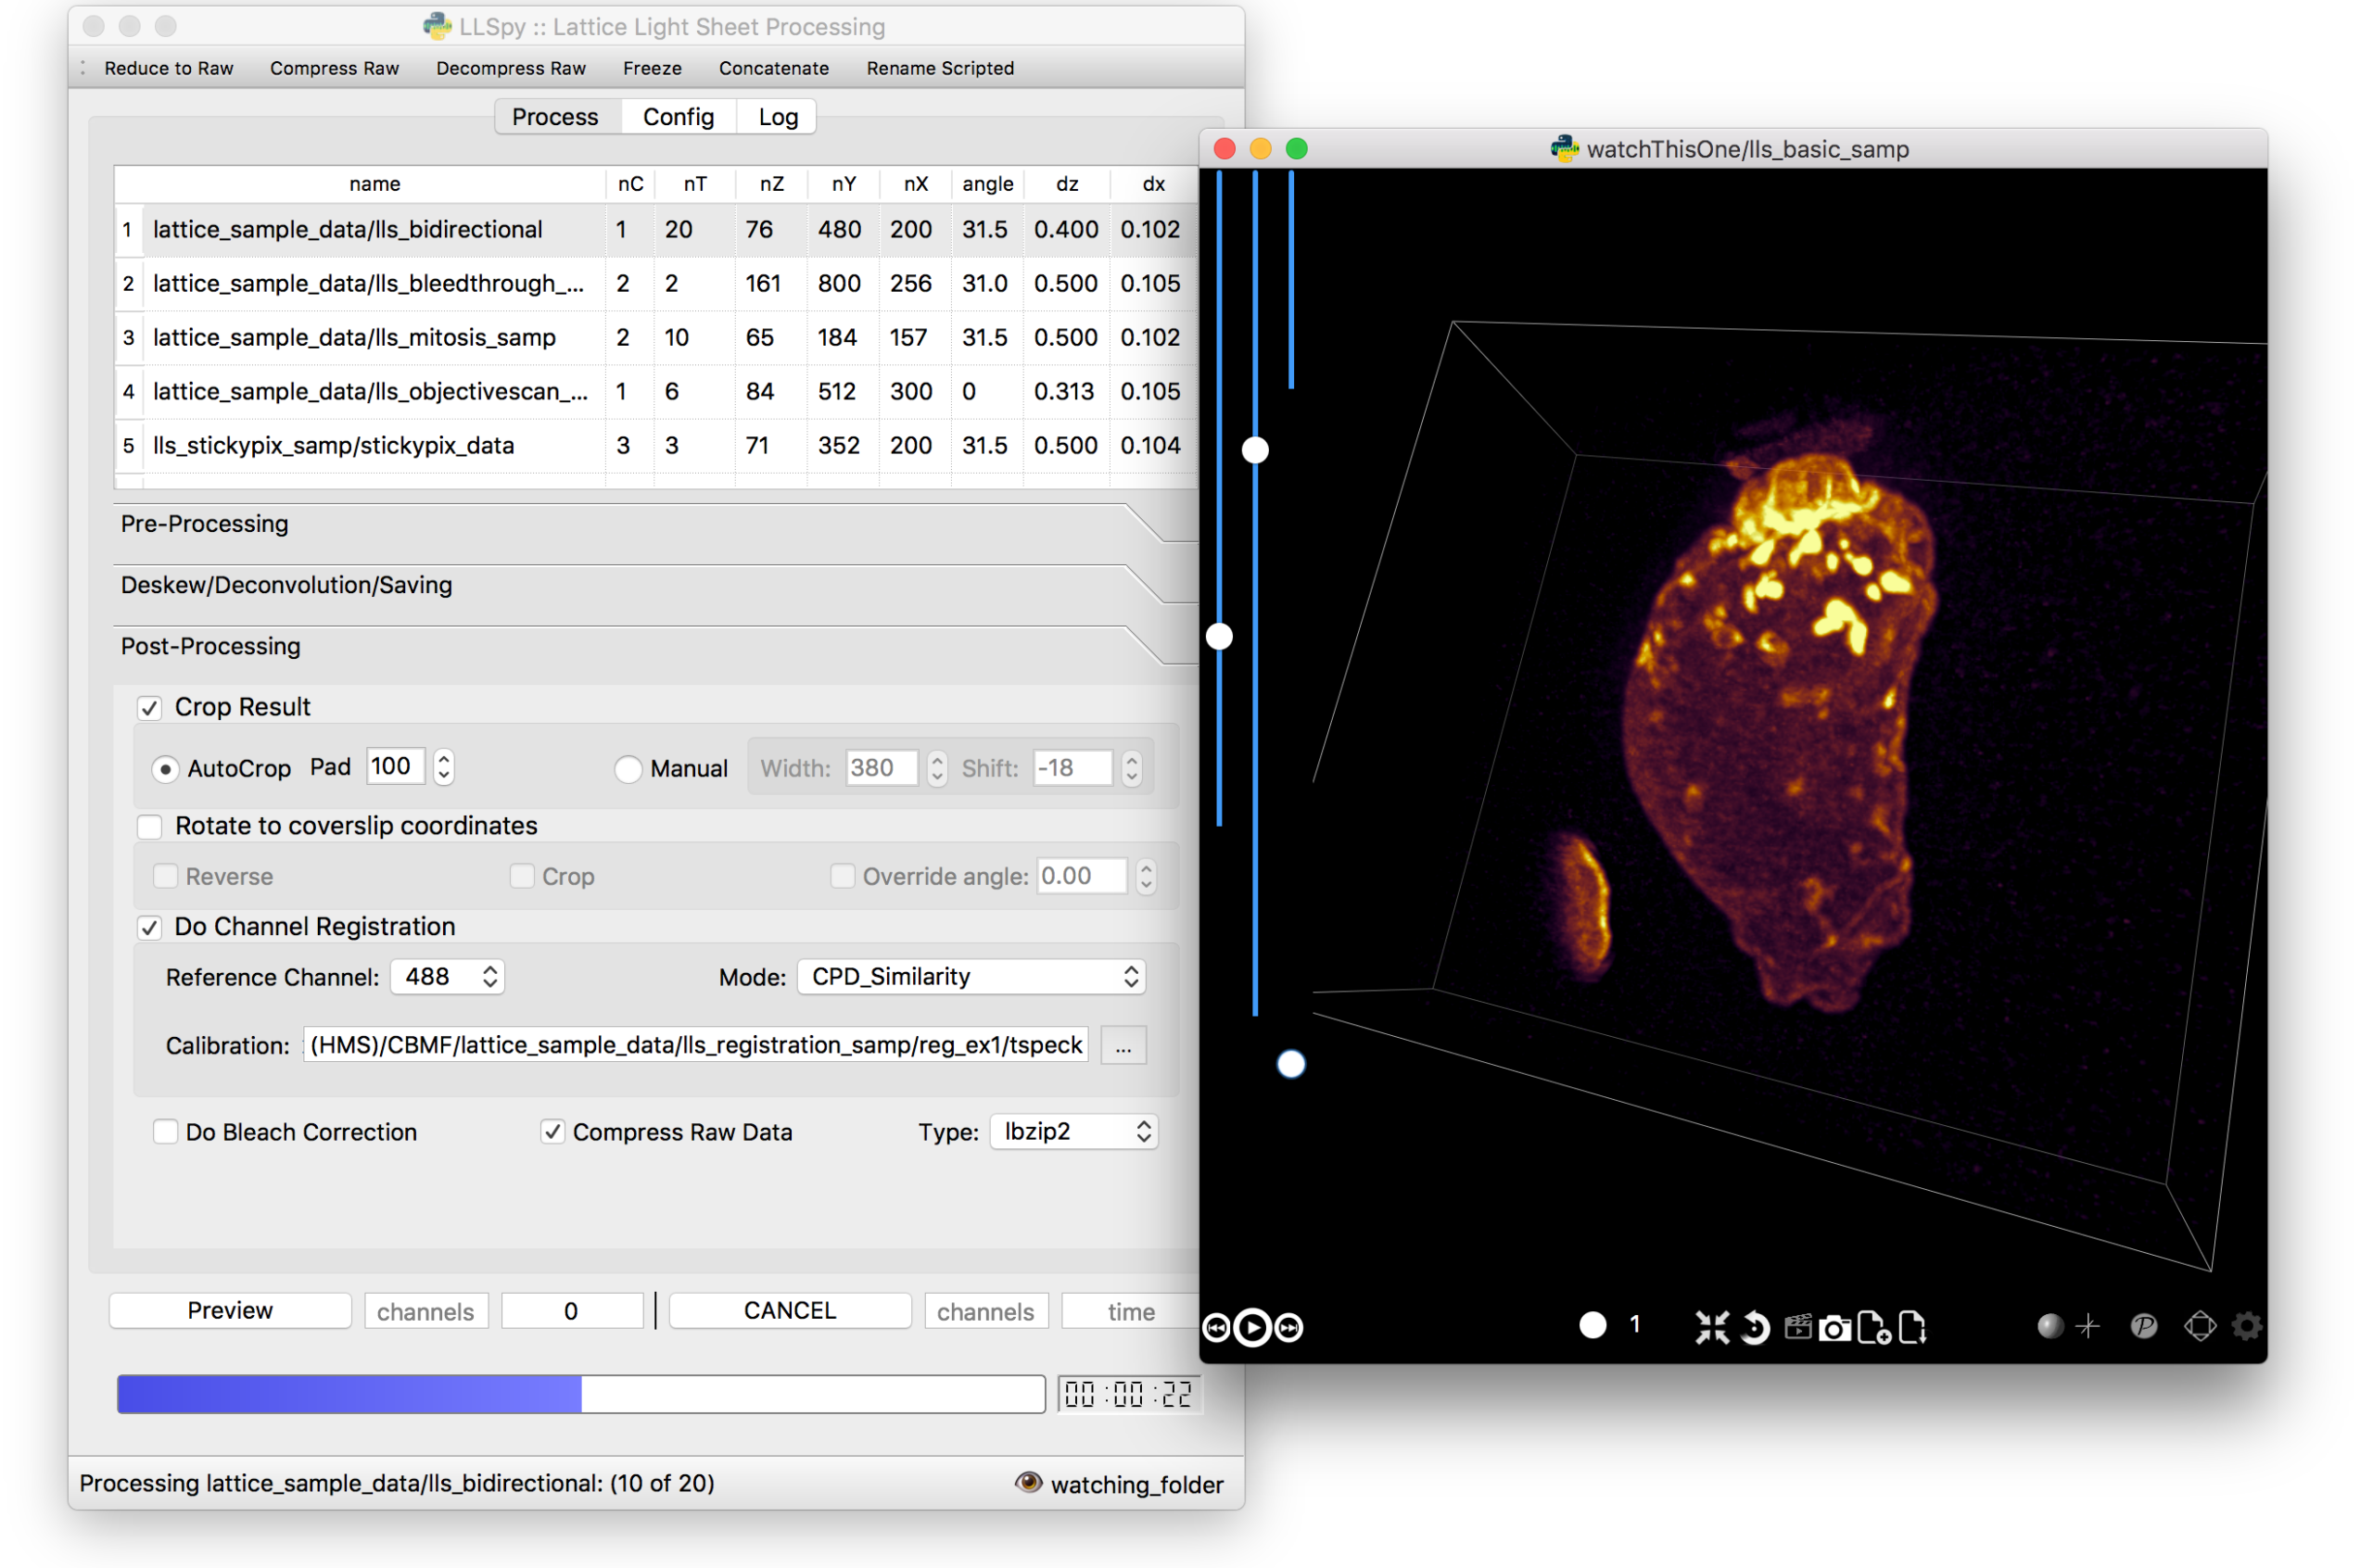
1. Graphical User Interface
The GUI provides access to the majority of functionality in LLSpy. It includes a
drag-and drop queue, visual progress indicator, and the ability to preview data
processed with the current settings using the (awesome) 4D-viewer,
Spimagine,
and experimental support for napari.
2. Command Line Interface
The command line interface can be used to process LLS data in a server
environment (linux compatible).
$ lls --help

Usage: lls [OPTIONS] COMMAND [ARGS]...

  LLSpy

  This is the command line interface for the LLSpy library, to facilitate
  processing of lattice light sheet data using cudaDeconv and other tools.

Options:
  --version          Show the version and exit.
  -c, --config PATH  Config file to use instead of the system config.
  --debug
  -h, --help         Show this message and exit.

Commands:
  camera    Camera correction calibration
  clean     Delete LLSpy logs and preferences
  compress  Compression & decompression of LLSdir
  config    Manipulate the system configuration for LLSpy
  decon     Deskew and deconvolve data in LLSDIR.
  deskew    Deskewing only (no decon) of LLS data
  gui       Launch LLSpy Graphical User Interface
  info      Get info on an LLSDIR.
  install   Install cudaDeconv libraries and binaries
  reg       Channel registration

# process a dataset
$ lls decon --iters 8 --correctFlash /path/to/dataset

# change system or user-specific configuration
$ lls config --set otfDir path/to/PSF_and_OTFs

# or launch the gui
$ lls gui
3. Interactive data processing in a python console
>>>importllspy# the LLSdir object contains most of the useful attributes and# methods for interacting with a data folder containing LLS tiffs>>>E=llspy.LLSdir('path/to/experiment_directory')
# it parses the settings file into a dict:>>>E.settings
{'acq_mode': 'Z stack',
'basename': 'cell1_Settings.txt',
'camera': {'cam2name': '"Disabled"',
'cycle': '0.01130',
'cycleHz': '88.47 Hz',
'exp': '0.01002',
...
}
# many important attributes are in the parameters dict>>>E.parameters
{'angle': 31.5,
'dx': 0.1019,
'dz': 0.5,
'nc': 2,
'nt': 10,
'nz': 65,
'samplescan': True,
...
}
# and provides methods for processing the data>>>E.autoprocess()
# the autoprocess method accepts many options as keyword aruguments# a full list with descriptions can be seen here:>>>llspy.printOptions()
NameDefaultDescription----------------------correctFlashFalsedoFlashresidualcorrectionflashCorrectTargetcpu {"cpu", "cuda", "parallel"} forFlashCornIters10deconvolutionitersmergeMIPsTruedoMIPmergeintosinglefile (decon)
otfDirNonedirectorytolookinforPSFs/OTFstRangeNonetimerangetoprocess (Nonemeansall)
cRangeNonechannelrangetoprocess (Nonemeansall)
... ... ...
# as well as file handling routines>>>E.compress(compression='lbzip2') # compress the raw data into .tar.(bz2|gz)>>>E.decompress() # decompress files for re-processing>>>E.freeze() # delete all processed data and compress raw data for long-term storage.
Note: The LLSpy API is currently unstable (subject to change). Look at
the llspy.llsdir.LLSdir class as a starting point for most of the
useful methods. Minimal documentation available in the docs. Feel free
to fork this project on github and suggest changes or additions.
Requirements
Compatible with Windows (tested on 7/10), Mac or Linux (tested on
Ubuntu 16.04)
Python 3.6 (as of version 0.4.0, support for 2.7 and 3.5 ended)
Most functionality assumes a data folder structure as generated by
the Lattice Scope LabeView acquisition software written by Dan
Milkie in the Betzig lab. If you are using different acquisition
software (such as 3i software), it is likely that you will need to
change the data structure and metadata parsing routines in order to
make use of this software.
Currently, the core deskew/deconvolution processing is based on
cudaDeconv, written by Lin Shao and maintained by Dan Milkie.
cudaDeconv is licensed and distributed by HHMI. It was open-sourced
in Feb 2019, and is available here:
https://github.com/dmilkie/cudaDecon
CudaDeconv requires a CUDA-capable GPU
The Spimagine viewer requires a working OpenCL environment
The create -n llsenv line creates a virtual environment. This is
optional, but recommended as it easier to uninstall cleanly and
prevents conflicts with any other python environments. If
installing into a virtual environment, you must source the
environment before proceeding, and each time before using llspy.
Each time you use the program, you will need to activate the virtual
environment. The main command line interface is lls, and the gui can
be launched with lls gui. You can create a bash script or batch file
to autoload the environment and launch the program if desired.
# Launch Anaconda Prompt and type...
conda activate llsenv

# show the command line interface help menu
lls -h
# process a dataset
lls decon /path/to/dataset
# or launch the gui
lls gui
graphical user interface with persistent/saveable processing
settings
command line interface for remote/server usage (coming)
preview processed image to verify settings prior to processing full
experiment
Pre-processing corrections:
correct “residual electron” issue on Flash4.0 when using
overlap synchronous mode. Includes CUDA and parallel CPU
processing as well as GUI for generation of calibration file.
apply selective median filter to particularly noisy pixels
trim image edges prior to deskewing (helps with CMOS edge row
artifacts)
auto-detect background
Processing:
select subset of acquired images (C or T) for processing
automatic parameter detection based on auto-parsing of
Settings.txt
automatic OTF generation/selection from folder of raw PSF files,
based on date of acquisition, mask used (if entered into
SPIMProject.ini), and wavelength.
graphical progress bar and time estimation
Post-processing:
proper voxel-size metadata embedding (newer version of Cimg)
join MIP files into single hyperstack viewable in ImageJ/Fiji
automatic width/shift selection based on image content (“auto
crop to features”)
Server mode: designate a folder to watch for incoming finished
LLS folders (with Settings.txt file). When new folders are
detected, they are added to the processing queue and the queue
is started if not already in progress.
Acquisition mode: designed to be used on the acquisition
computer. Designate folder to watch for new LLS folders, and
process new files as they arrive. Similar to built in GPU
processing tab in Lattice Scope software, but with the addition
of all the corrections and parameter selection in the GUI.
easily return LLS folder to original (pre-processed) state
compress and decompress folders and subfolders with lbzip2 (not
working on windows)
concatenate two experiments – renaming files with updated relative
timestamps and stack numbers
rename files acquired in script-editor mode with Iter_ in the name
to match standard naming with positions (work in progress)
cross-platform: includes precompiled binaries and shared libraries
that should work on all systems.
CUDA version (type nvcc --version at command line prompt)
Python version (type python --version at command line prompt, with
llsenv conda environment active if applicable)
The most system-dependent component (and the most likely to fail) is the
OpenCL dependency for Spimagine. LLSpy will fall back gracefully to the
built-in Qt-based viewer, but the Spimagine option will be will be
unavailble and grayed out on the config tab in the GUI. Submit an issue
on github for help.
Runs the app in the development mode.
Open http://localhost:3000 to view it in your browser.
The page will reload when you make changes.
You may also see any lint errors in the console.
npm test
Launches the test runner in the interactive watch mode.
See the section about running tests for more information.
npm run build
Builds the app for production to the build folder.
It correctly bundles React in production mode and optimizes the build for the best performance.
The build is minified and the filenames include the hashes.
Your app is ready to be deployed!
See the section about deployment for more information.
npm run eject
Note: this is a one-way operation. Once you eject, you can’t go back!
If you aren’t satisfied with the build tool and configuration choices, you can eject at any time. This command will remove the single build dependency from your project.
Instead, it will copy all the configuration files and the transitive dependencies (webpack, Babel, ESLint, etc) right into your project so you have full control over them. All of the commands except eject will still work, but they will point to the copied scripts so you can tweak them. At this point you’re on your own.
You don’t have to ever use eject. The curated feature set is suitable for small and middle deployments, and you shouldn’t feel obligated to use this feature. However we understand that this tool wouldn’t be useful if you couldn’t customize it when you are ready for it.
minhash_v.py is the vectorized version; the use of an initializer avoids synchronization stalls and memory bubbles with large inputs. Unix only, as changes to the NumPy array do not get carried back to the main process in Windows
lessons learned
a simple heuristic can significantly decrease running time while still finding a large majority of similar files
if the input iterator is very large, using map will lead to a segmentation fault
if a function returns results faster than they can be consumed, using it with imap and imap_unordered will cause a memory bubble
pypy3 is significantly faster than python3, but it did not support Numba
minimize your inputs before passing them off to a function (e.g. grouping results uses connected_components from networkx which had high space complexity)
vectorize, if possible
measurements
a random selection of non-duplicate text files of varying sizes (0-1767kb):
!!THIS SOFTWARE WAS PART OF A HIGH SCHOOL IN-CLASS ASSIGNMENT!!
COVID-19 had a significant impact on our lives, which we still continue to suffer from. Tourism has been one of the most impacted industries around the world, and the tourism industry in Japan is no exception. However in 2021, many businesses have started to reopen and many other restrictions are expected to follow suit, thanks to the hard work of the front-line workers and the vaccines manufactures. With our lives returning to the normal, it has become the perfect time for people to start their planning for their next vacation. My software, Project NFC, encourages people around the world to visit Japan, by showcasing the beauties of Japan and its culture, while also delivering COVID related facts for a safer trip.
Underlying Software Design
The 2 factors, interests toward Japan and safeties of traveling, had to be accounted for in my software. Does are what the visitors are most concerned about. Therefore, my decision was to use simple maps and short articles derived from Wikipedia.org as the main features.
I chose to use a single map instead of dozens of graphs, since many websites online take the graph approach, which I find to be challenging to comprehend at a single glance. While graphs are convenient in packing huge amounts of information, I wanted a solution that was both easy to understand and less space consuming. Having a single image that uses colored dots fulfills my expectations, rather than 47 graphs, one for each prefecture.
Image above is a screenshot of the final product. The JPanel contains a map of Japan, with colored dots in the foreground to indicate the risks of visiting the prefecture. The risk is estimated from a value which is the average of the case numbers in the past 2 weeks divided by the population. If that value is above a certain threshold, the risk is determined to be moderate or high (0.00003, or average of 3 new cases in a population of 10,000 is considered high risk). By using colored dots, I have embraced the simplicity of the diagram, making the software easier for the user to understand. Even though I must note that those calculated “risk values” are lacking scientific evidence, I think it may be one of the factors that the users can consider in their trip planning process and also during their trip.
The decision of deriving articles from Wikipedia.org has been made considering the accuracy of their information and the iterative development made by the community. Different approach may have been to write the articles by myself, which would have been much more time consuming and may also be limited in its credibility. Furthermore, another factor that lead to my decision is that many other APIs were paid or did not work web-based (Ex: requires the implementation of JavaScript). In contrast, API from Wikipedia.org is free to use, and is very responsive.
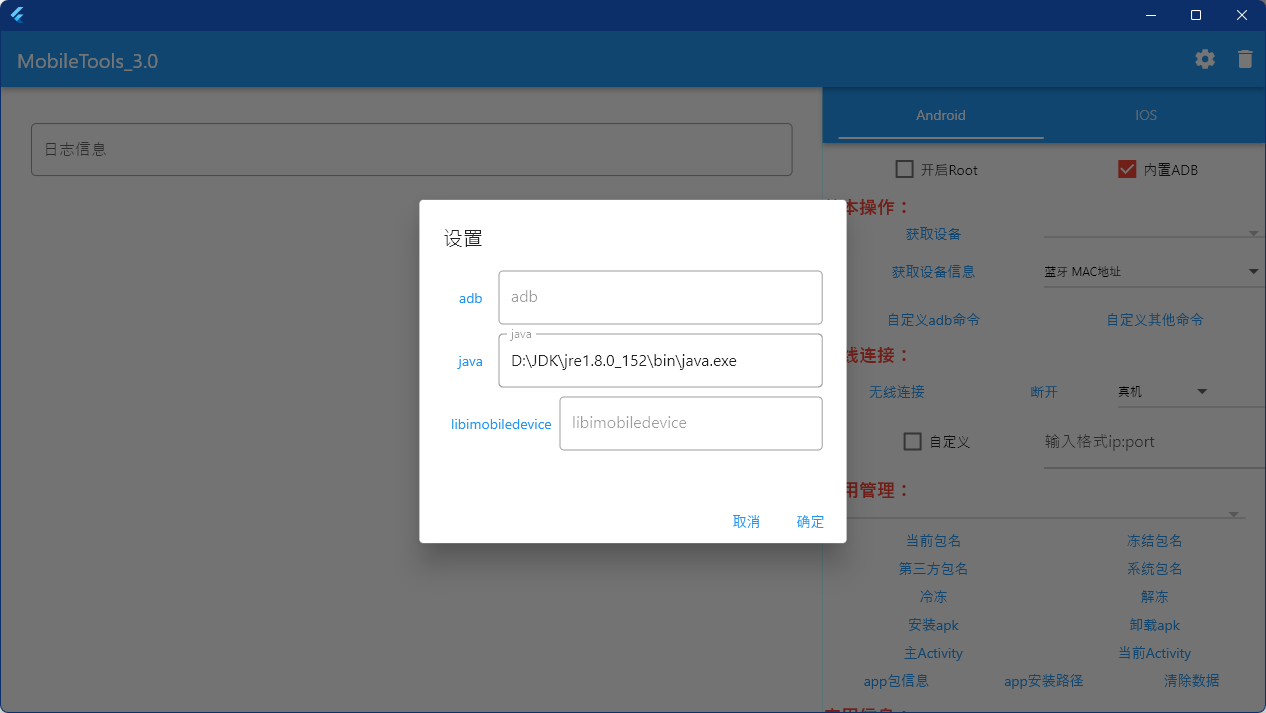
This is another screenshot from the final product. On the left side, there are short articles that describe the place, along with a couple images to gain a better understanding. As I have said, the articles are derived from wikipedia.org, and the user can read more about the place by clicking on “(From Wikipedia)”. The other hyperlink, “See in Google map”, opens Google map in the browser. The map on the right side gives the user a brief understanding of where the place is located. The images are chosen by me, and were downloaded from HERE. The images were all free to use. I had to downsize or upscale some of the images to make them fit into the GUI.
In behind the GUIs, I had been working hard on making the software as generic as possible. Since I plan on expanding on this software for not only Japan but also other countries, I used Java features such as inheritance and abstract classes so that I can reuse most of the classes from this program. I have also implemented an easy-injection feature for the language files, avoiding the hard-coding of texts for each language option. Currently, the program supports English and partially, Japanese.
Conclusion
As for the conclusion, I consider that my program and its main two features have been successful in addressing the proposed issue. By combining the ideas of case number dash board and a guidebook, it acts as a tool for the people around the world to know more about Japan, and to also consider about their next trip. Unfortunately, it is only a suggesting tool, and is only combining the features found online, so it has very limited amounts of originality. In future programs, I should combine other studies, such as business, in order to address the issue around the idea of market-in, and not product-in. Also, this program has its major problem in gaining more users, so cooperating with actual businesses and listening to the consumers will be my next goal. Nonetheless, I strongly wish that people who are planning their next vacation to stop by and take a peek at my software; and potentially, have a safe and exciting trip in Japan.
Future Development
Improving the accuracy in risk prediction.
May be addressed by using machine learning and using a data model to give a prediction.
Reinforcing the translator section
Using paid API services such as Google Translate API is an option.
Expanding the platform to gain more users
Shifting development towards web-base and smartphone users can be a step forward.
Huge thanks to our Computer Science teacher Mr. Cheng for his support, and also to my classmates.
Special thanks to my parents, my sister, and my best friend, Nic. 🙂
This is a project written by C# that can intercept instance method you want
You can do something before and do something after when you invoke the method
why use Tony.Interceptor
You can image you have write thousands of methods.one day ,your boss requires you to add the log for each method,you are driven mad.Would you want to write the log code in each method?
or you use the third part AOP Framework?That is very heavy
No,this is the reason you use Tony.Intercetor!!!
usage
1.define a class that implement the interface IInterceptor:
so you can handle the BeforeInvoke and AfterInvoke
2.markup the class or method that you want to Intercept
First of all,the class must extend to Interceptable,in fact,the class Interceptable extends from ContextBoundObject,just put the class into the environment context
Then,you can use InterceptorAttribute to mark the class or a instance method in the class
If you mark the class ,it intercepts all the public instance method by default.
If you do not want to intercept a method int the marked class,you can use InterceptorIgnoreAttribute
This is an implementation of triple buffering written in Rust. You may find it
useful for the following class of thread synchronization problems:
There is one producer thread and one consumer thread
The producer wants to update a shared memory value periodically
The consumer wants to access the latest update from the producer at any time
For many use cases, you can use the ergonomic write/read interface, where
the producer moves values into the buffer and the consumer accesses the
latest buffer by shared reference:
// Create a triple bufferuse triple_buffer::triple_buffer;let(mut buf_input,mut buf_output) = triple_buffer(&0);// The producer thread can move a value into the buffer at any timelet producer = std::thread::spawn(move || buf_input.write(42));// The consumer thread can read the latest value at any timelet consumer = std::thread::spawn(move || {let latest = buf_output.read();assert!(*latest == 42 || *latest == 0);});// Wait for both threads to be done
producer.join().unwrap();
consumer.join().unwrap();
In situations where moving the original value away and being unable to
modify it on the consumer’s side is too costly, such as if creating a new
value involves dynamic memory allocation, you can use a lower-level API
which allows you to access the producer and consumer’s buffers in place
and to precisely control when updates are propagated:
// Create and split a triple bufferuse triple_buffer::triple_buffer;let(mut buf_input,mut buf_output) = triple_buffer(&String::with_capacity(42));// --- PRODUCER SIDE ---// Mutate the input buffer in place{// Acquire a reference to the input bufferlet input = buf_input.input_buffer_mut();// In general, you don't know what's inside of the buffer, so you should// always reset the value before use (this is a type-specific process).
input.clear();// Perform an in-place update
input.push_str("Hello, ");}// Publish the above input buffer update
buf_input.publish();// --- CONSUMER SIDE ---// Manually fetch the buffer update from the consumer interface
buf_output.update();// Acquire a read-only reference to the output bufferlet output = buf_output.output_buffer();assert_eq!(*output,"Hello, ");// Or acquire a mutable reference if necessarylet output_mut = buf_output.output_buffer_mut();// Post-process the output value before use
output_mut.push_str("world!");
Finally, as a middle ground before the maximal ergonomics of the
write() API and the maximal control of the
input_buffer_mut()/publish()
API, you can also use the
input_buffer_publisher() RAII API on the
producer side, which ensures that publish() is automatically called when
the resulting input buffer handle goes out of scope:
// Create and split a triple bufferuse triple_buffer::triple_buffer;let(mut buf_input, _) = triple_buffer(&String::with_capacity(42));// Mutate the input buffer in place and publish it{// Acquire a reference to the input bufferletmut input = buf_input.input_buffer_publisher();// In general, you don't know what's inside of the buffer, so you should// always reset the value before use (this is a type-specific process).
input.clear();// Perform an in-place update
input.push_str("Hello world!");// Input buffer is automatically published at the end of the scope of// the "input" RAII guard}// From this point on, the consumer can see the updated version
Give me details! How does it compare to alternatives?
Compared to a mutex:
Only works in single-producer, single-consumer scenarios
Is nonblocking, and more precisely bounded wait-free. Concurrent accesses will
be slowed down by cache contention, but no deadlock, livelock, or thread
scheduling induced slowdown is possible.
Allows the producer and consumer to work simultaneously
Uses a lot more memory (3x payload + 3x bytes vs 1x payload + 1 bool)
Does not allow in-place updates, as the producer and consumer do not access
the same memory location
Should have faster reads and slower updates, especially if in-place updates
are more efficient than writing a fresh copy of the data.
When the data hasn’t been updated, the readout transaction of triple
buffering only requires a memory read, no atomic operation, and it can be
performed in parallel with any ongoing update.
When the data has been updated, the readout transaction requires an
infaillible atomic operation, which may or may not be faster than the
faillible atomic operations used by most mutex implementations.
Unless your data cannot be updated in place and must always be fully
rewritten, the ability provided by mutexes to update data in place should
make updates a lot more efficient, dwarfing any performance difference
originating from the synchronization protocol.
Compared to the read-copy-update (RCU) primitive from the Linux kernel:
Only works in single-producer, single-consumer scenarios
Has higher dirty read overhead on relaxed-memory architectures (ARM, POWER…)
Does not require accounting for reader “grace periods”: once the reader has
gotten access to the latest value, the synchronization transaction is over
Does not use the compare-and-swap hardware primitive on update, which is
inefficient by design as it forces its users to retry transactions in a loop.
Does not suffer from the ABA problem, allowing much simpler code
Allocates memory on initialization only, rather than on every update
May use more memory (3x payload + 3x bytes vs 1x pointer + amount of
payloads and refcounts that depends on the readout and update pattern)
Should be slower if updates are rare, faster if updates are frequent
The RCU’s happy reader path is slightly faster (no flag to check), but its
update procedure is a lot more involved and costly.
Compared to sending the updates on a message queue:
Only works in single-producer, single-consumer scenarios (queues can work in
other scenarios, although the implementations are much less efficient)
Consumer only has access to the latest state, not the previous ones
Consumer does not need to get through every previous state
Is nonblocking AND uses bounded amounts of memory (with queues, it’s a choice,
unless you use one of those evil queues that silently drop data when full)
Can transmit information in a single move, rather than two
Should be faster for any compatible use case.
Queues force you to move data twice, once in, once out, which will incur a
significant cost for any nontrivial data. If the inner data requires
allocation, they force you to allocate for every transaction. By design,
they force you to store and go through every update, which is not useful
when you’re only interested in the latest version of the data.
In short, triple buffering is what you’re after in scenarios where a shared
memory location is updated frequently by a single writer, read by a single
reader who only wants the latest version, and you can spare some RAM.
If you need multiple producers, look somewhere else
If you need multiple consumers, you may be interested in my related “SPMC
buffer” work, which basically extends triple buffering to multiple consumers
If you can’t tolerate the RAM overhead or want to update the data in place,
try a Mutex instead (or possibly an RWLock)
If the shared value is updated very rarely (e.g. every second), try an RCU
If the consumer must get every update, try a message queue
How do I know your unsafe lock-free code is working?
By running the tests, of course! Which is unfortunately currently harder than
I’d like it to be.
First of all, we have sequential tests, which are very thorough but obviously
do not check the lock-free/synchronization part. You run them as follows:
$ cargo test
Then we have concurrent tests where, for example, a reader thread continuously
observes the values from a rate-limited writer thread, and makes sure that he
can see every single update without any incorrect value slipping in the middle.
These tests are more important, but also harder to run because one must first
check some assumptions:
The testing host must have at least 2 physical CPU cores to test all possible
race conditions
No other code should be eating CPU in the background. Including other tests.
As the proper writing rate is system-dependent, what is configured in this
test may not be appropriate for your machine.
You must test in release mode, as compiler optimizations tend to create more
opportunities for race conditions.
Taking this and the relatively long run time (~10-20 s) into account, the
concurrent tests are ignored by default. To run them, make sure nothing is
eating CPU in the background and do:
$ cargo test --release -- --ignored --nocapture --test-threads=1
Finally, we have benchmarks, which allow you to test how well the code is
performing on your machine. We are now using criterion for said benchmarks,
which seems that to run them, you can simply do:
$ cargo install cargo-criterion
$ cargo criterion
These benchmarks exercise the worst-case scenario of u8 payloads, where
synchronization overhead dominates as the cost of reading and writing the
actual data is only 1 cycle. In real-world use cases, you will spend more time
updating buffers and less time synchronizing them.
However, due to the artificial nature of microbenchmarking, the benchmarks must
exercise two scenarios which are respectively overly optimistic and overly
pessimistic:
In uncontended mode, the buffer input and output reside on the same CPU core,
which underestimates the overhead of transferring modified cache lines from
the L1 cache of the source CPU to that of the destination CPU.
This is not as bad as it sounds, because you will pay this overhead no
matter what kind of thread synchronization primitive you use, so we’re not
hiding triple-buffer specific overhead here. All you need to do is to
ensure that when comparing against another synchronization primitive, that
primitive is benchmarked in a similar way.
In contended mode, the benchmarked half of the triple buffer is operating
under maximal load from the other half, which is much more busy than what is
actually going to be observed in real-world workloads.
In this configuration, what you’re essentially measuring is the performance
of your CPU’s cache line locking protocol and inter-CPU core data
transfers under the shared data access pattern of triple-buffer.
Therefore, consider these benchmarks’ timings as orders of magnitude of the best
and the worst that you can expect from triple-buffer, where actual performance
will be somewhere inbetween these two numbers depending on your workload.
On an Intel Core i3-3220 CPU @ 3.30GHz, typical results are as follows:
Clean read: 0.9 ns
Write: 6.9 ns
Write + dirty read: 19.6 ns
Dirty read (estimated): 12.7 ns
Contended write: 60.8 ns
Contended read: 59.2 ns
License
This crate is distributed under the terms of the MPLv2 license. See the LICENSE
file for details.
More relaxed licensing (Apache, MIT, BSD…) may also be negociated, in
exchange of a financial contribution. Contact me for details at
knights_of_ni AT gmx DOTCOM.