The repo provides a set of tools for creating PyTorch Geometric (PyG) data objects from AnnData objects, which are commonly used for storing and manipulating single-cell genomics data. In addition, the repo includes functionality for creating PyTorch Lightning (PyTorch-Lightning) DataModule objects from the PyG data objects, which can be used to create graph neural network (GNN) data pipelines. The PyG data objects represent graphs, where the nodes represent cells and the edges represent relationships between the cells, and can be used to perform GNN tasks such as node classification, graph classification, and link prediction. The repo is written in Python and utilizes the PyTorch, PyTorch Geometric, and PyTorch-Lightning libraries.
Getting started
Please refer to the documentation. In particular, the
Alioli is a food app that aims to centralize different recipe and product functionalities in one place.
Built with Flutter and Firebase, it includes the use of design patterns, NoSQL and SQLite databases, and integration with external APIs.
Download by clicking on the following image:
📸 Screenshots
📌 Features
With Alioli you can:
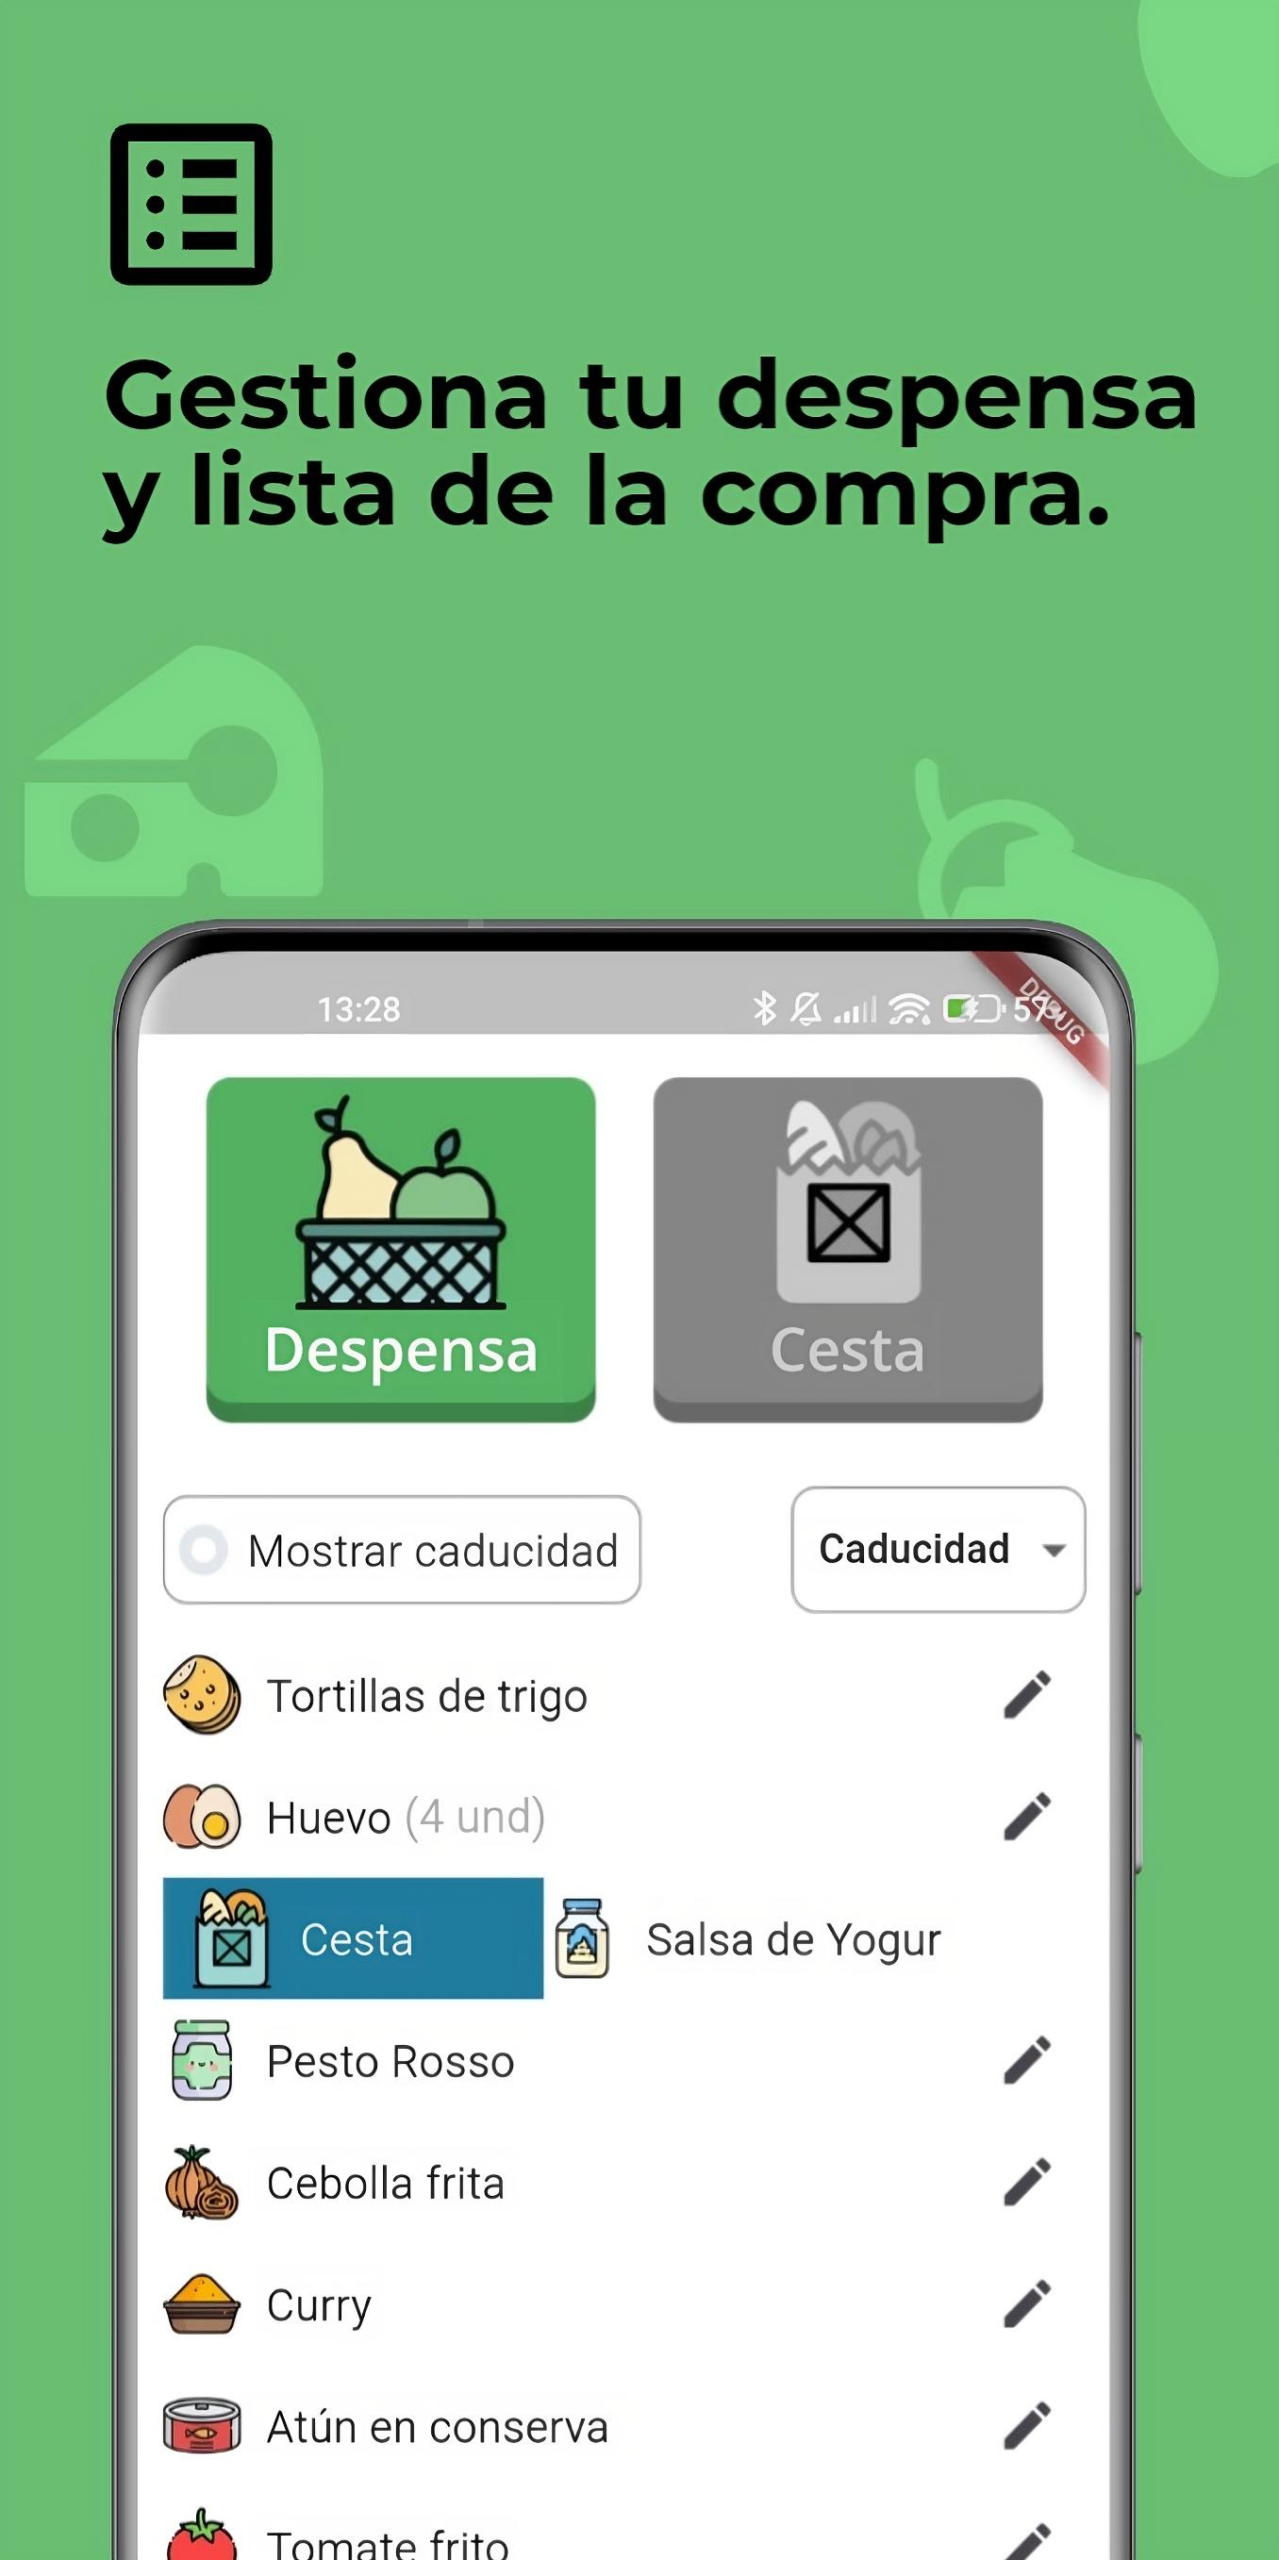
🛒 Organize your pantry food list, as well as your shopping list.
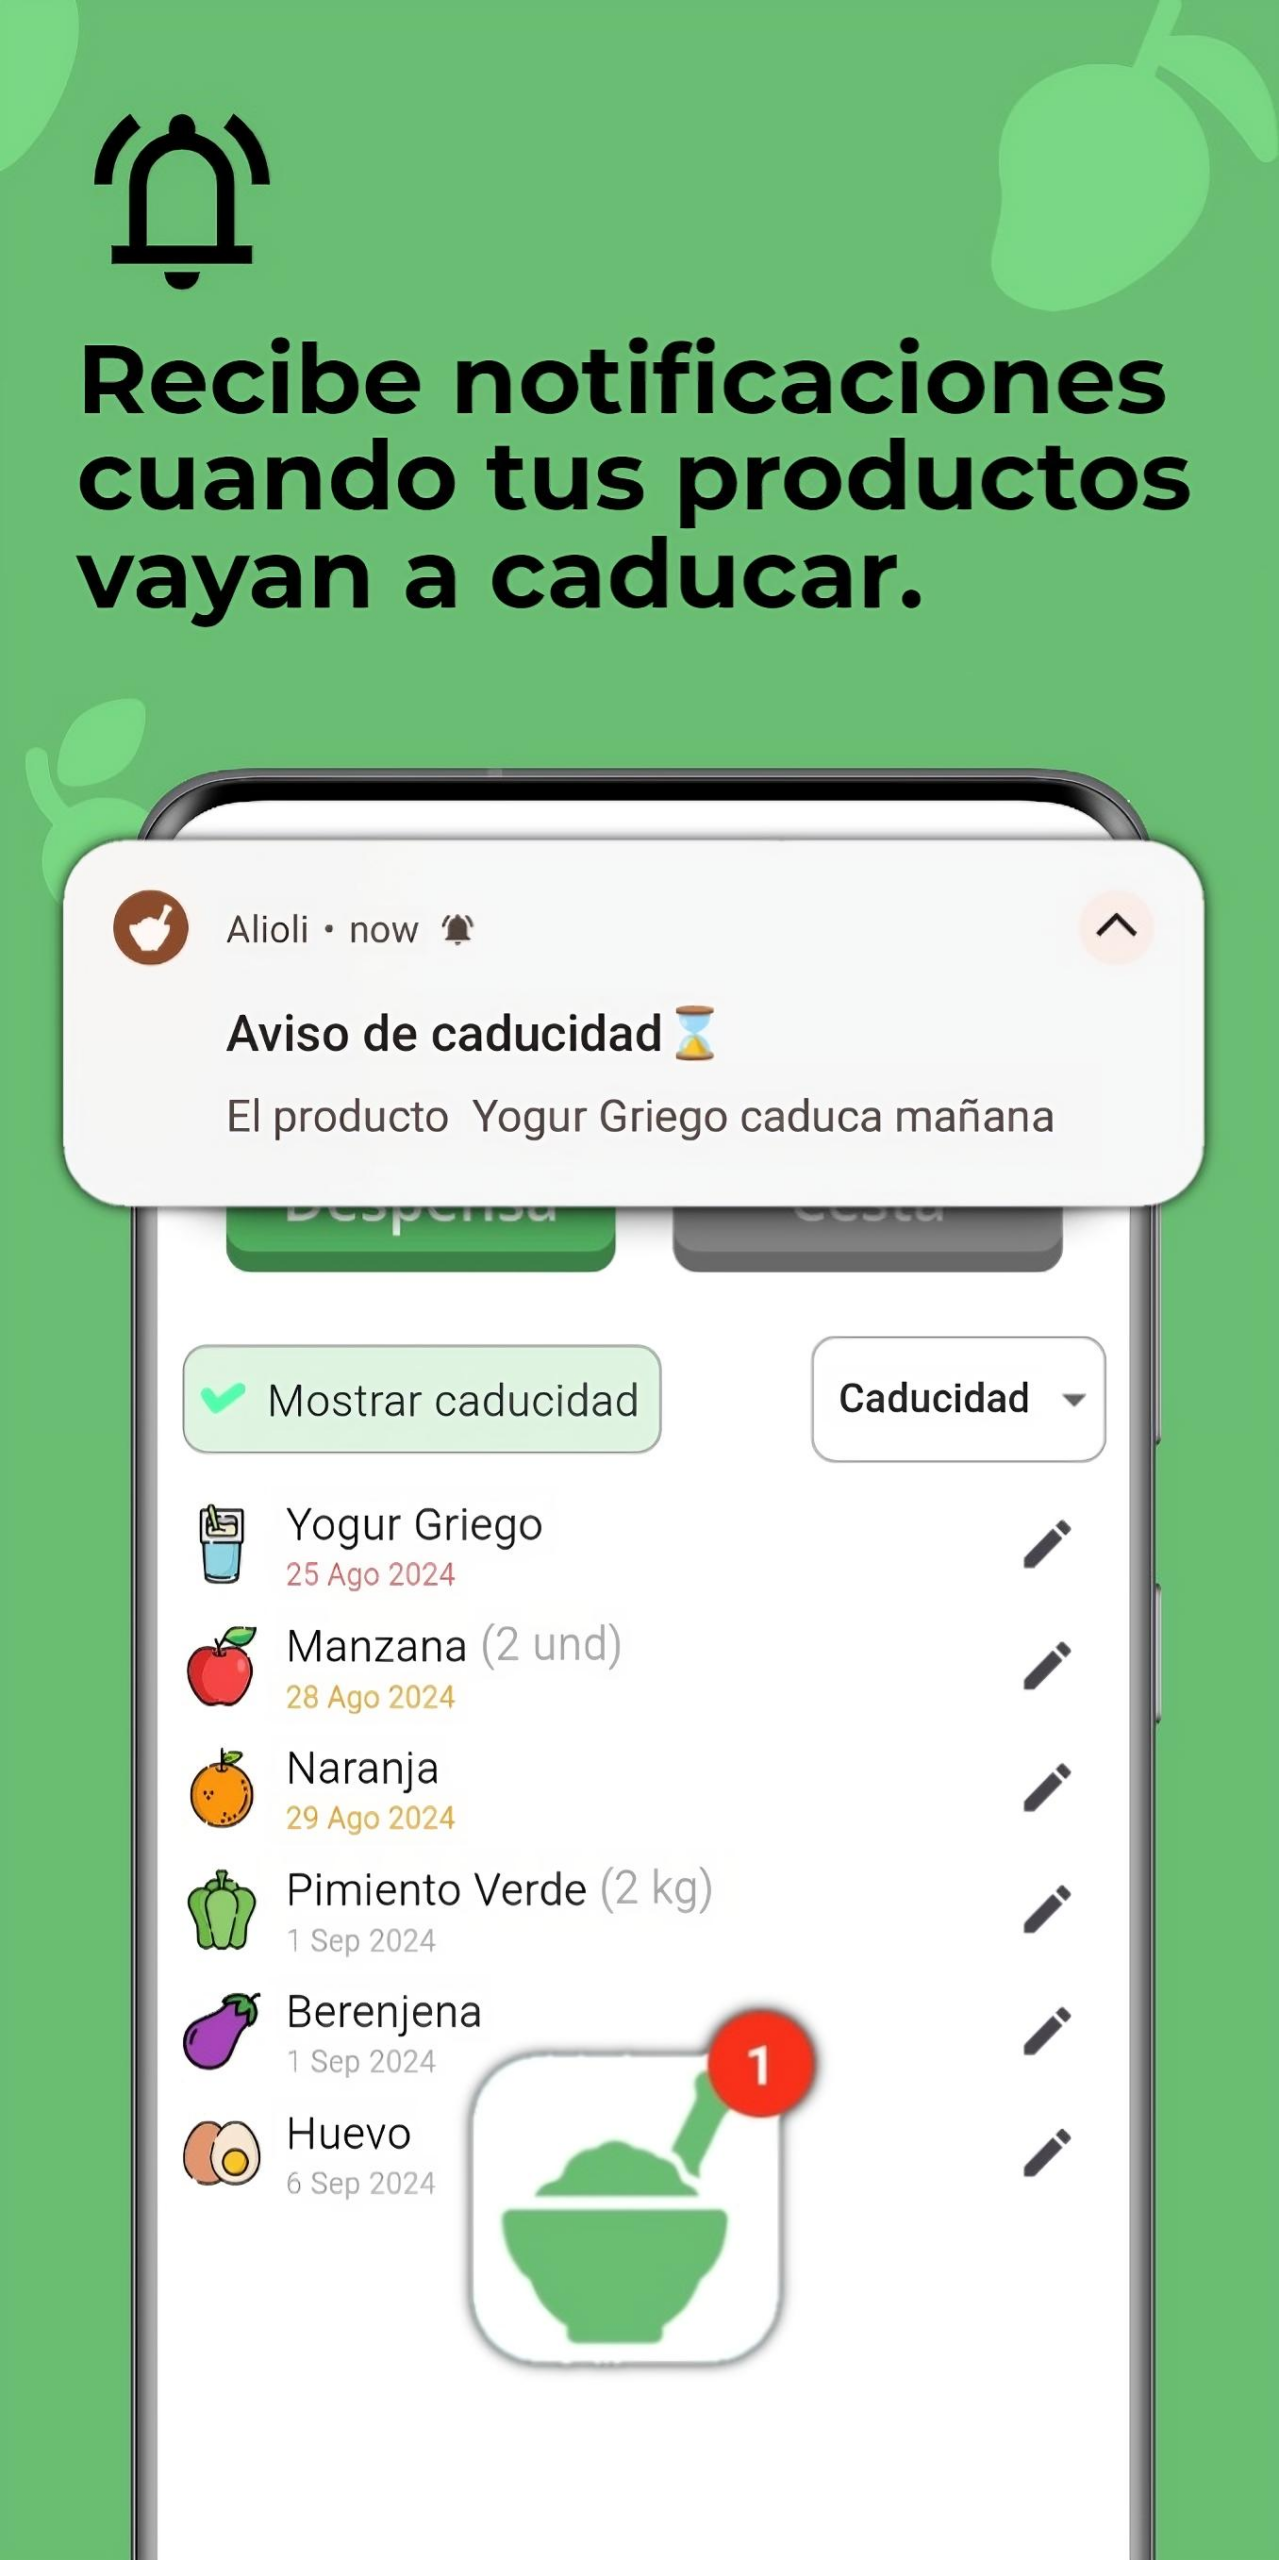
📅 Receive notifications when your products are close to their expiration date.
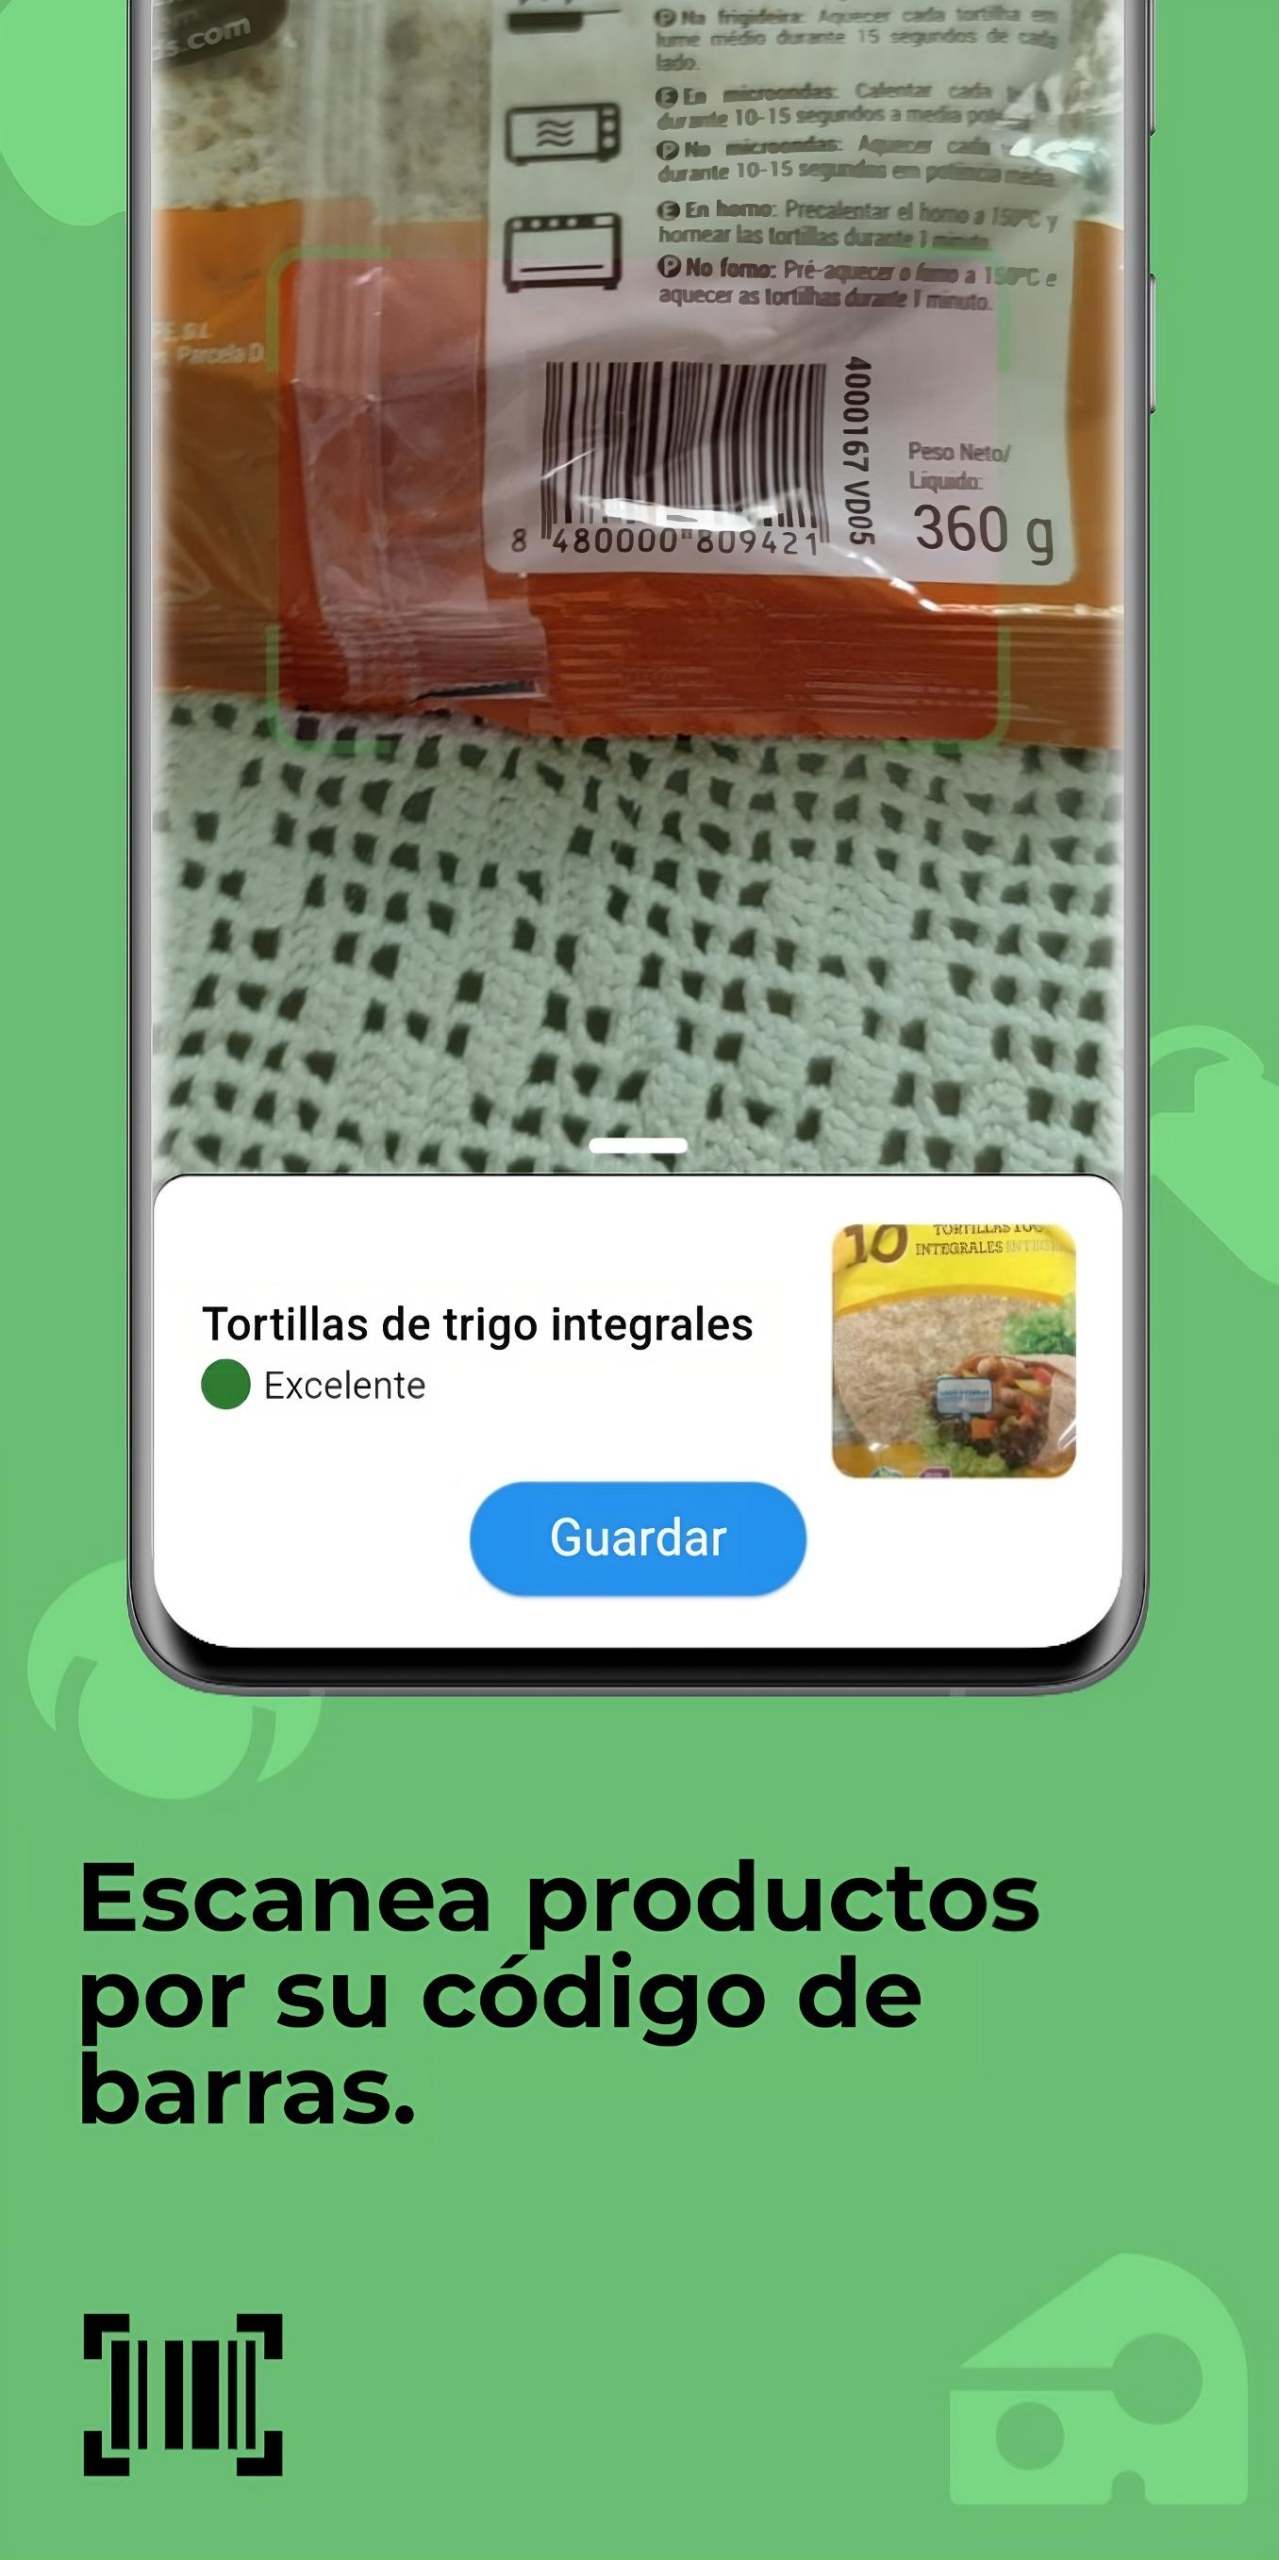
🔍 Scan the barcode of the products to get a summary of their nutritional information.
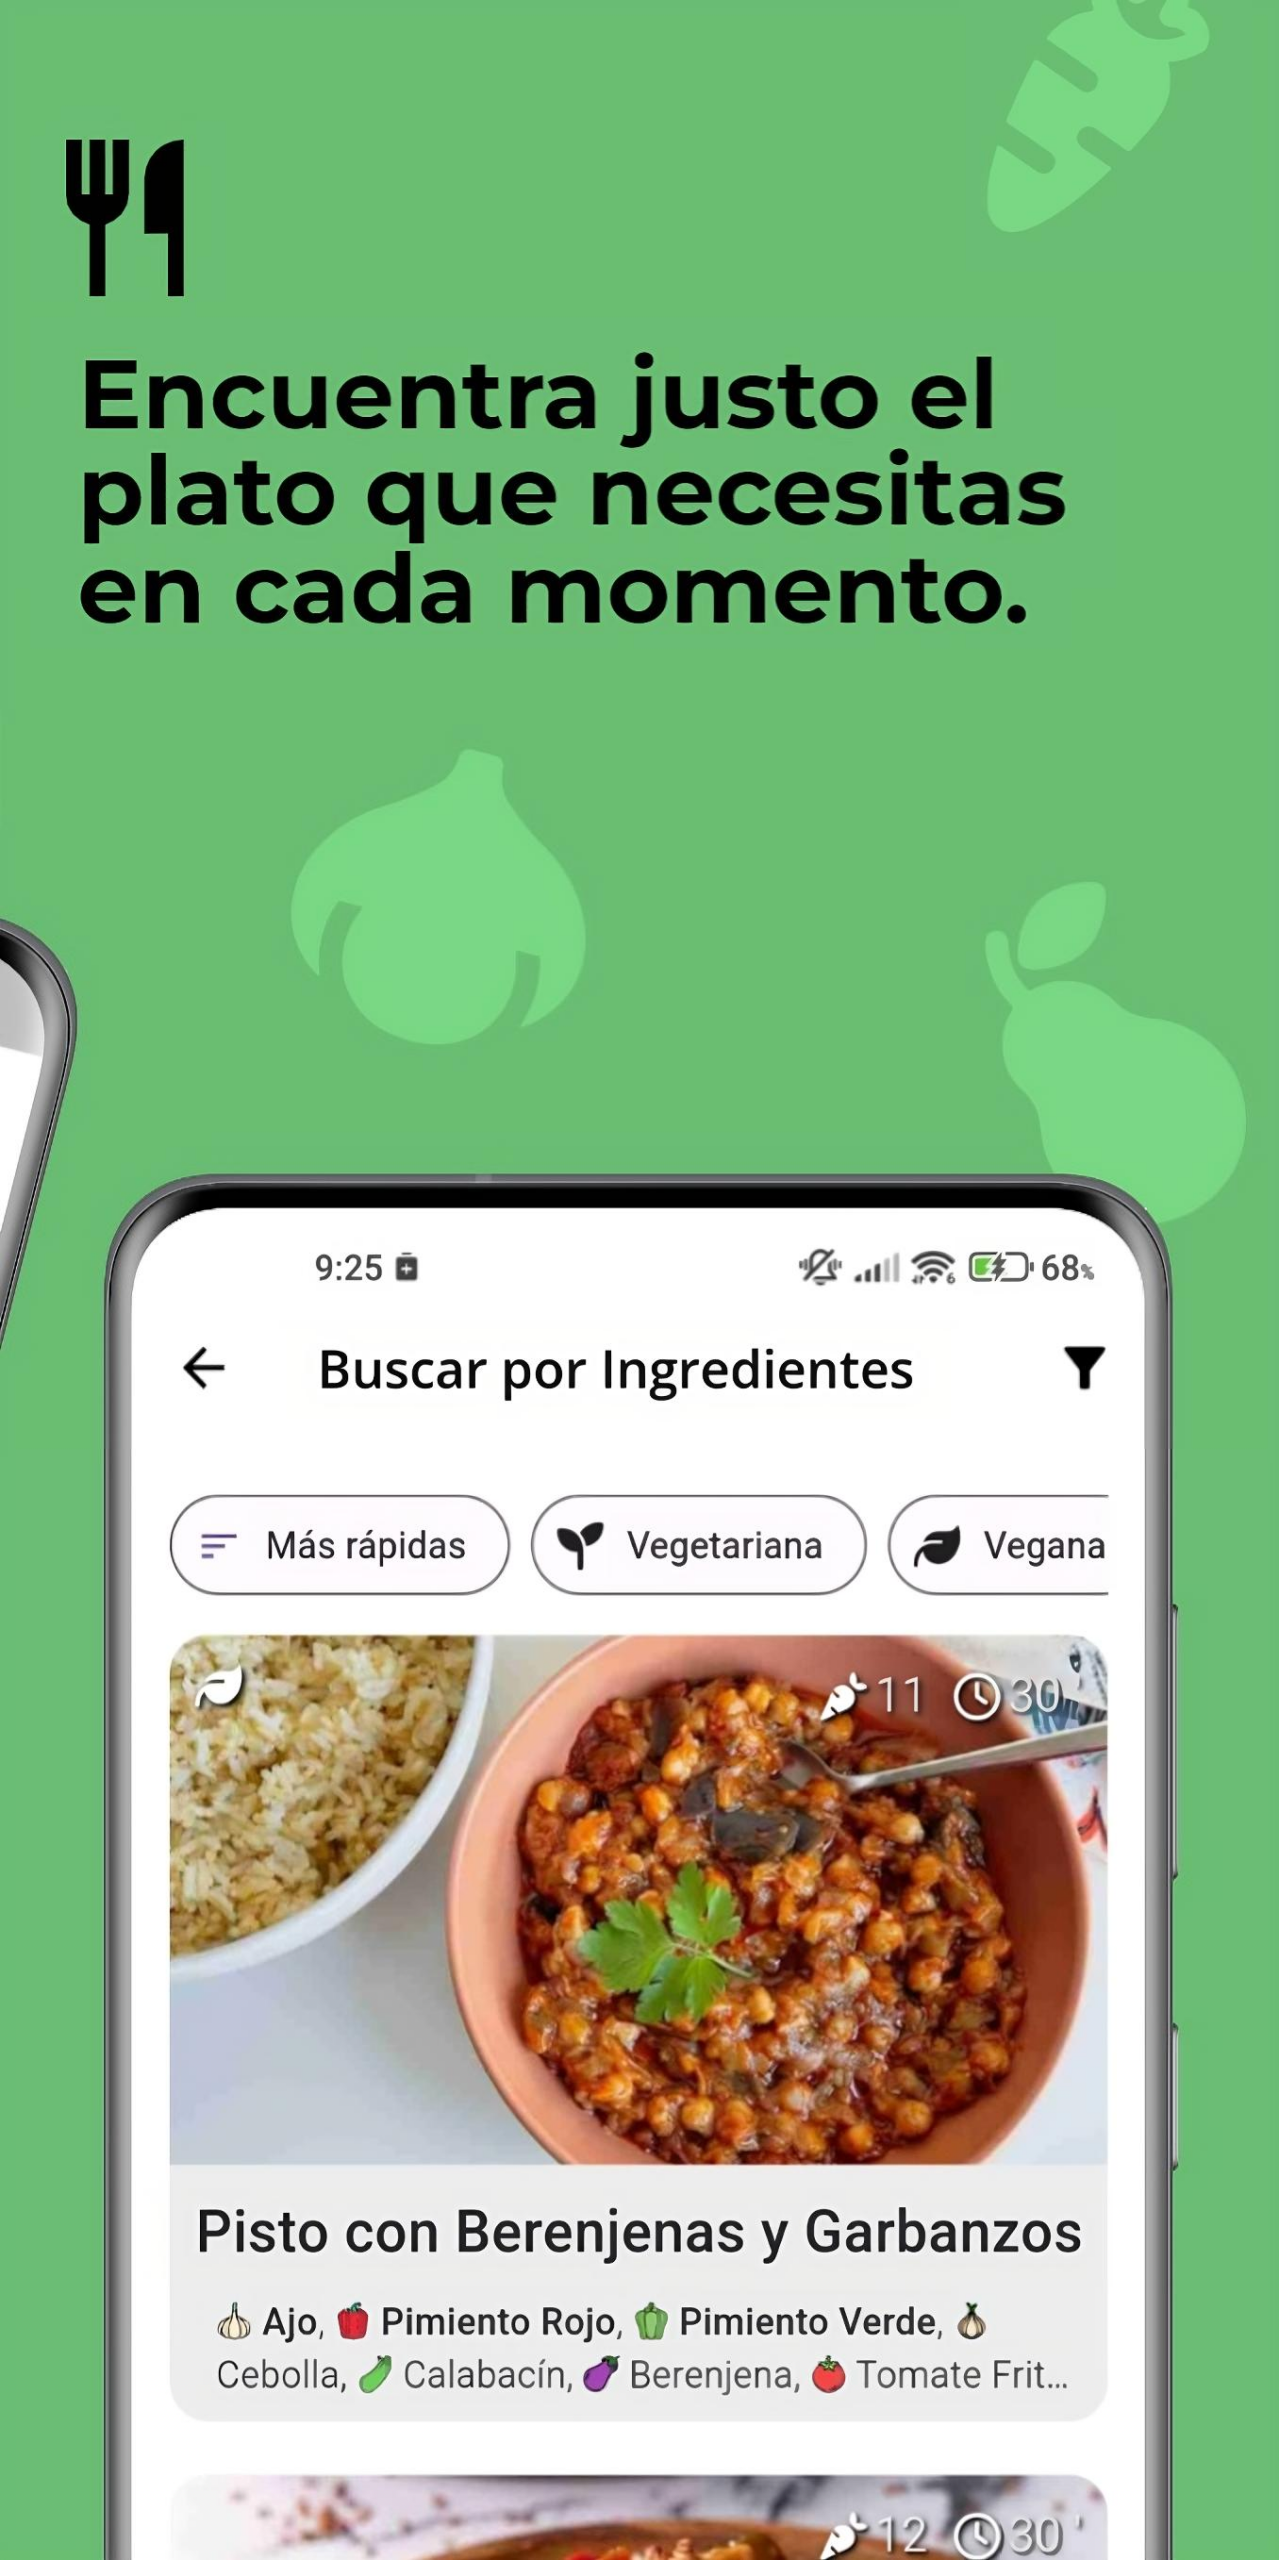
🥕 Search for recipes based on the foods in your pantry, among other search criteria such as recipe name or category to which they belong.
🔧 Apply a multitude of filters to searches, classifying them by vegan, vegetarian, preparation time, best rating or existence of videos among other filters.
📚 Create your own personalized recipe lists.
⬆️ Upload your own recipes to the platform so that they can be accessible by everyone.
Alioli – Aplicación en Flutter
Alioli es una aplicación sobre alimentación que trata de centralizar distintas funcionalidades sobre recetas y productos en un solo lugar.
Realizada con Flutter y Firebase, incluye el uso de patrones de diseño, bases de datos NoSQL y SQLite e integración con apis externas.
Descargar haciendo click sobre la siguiente imagen:
📸 Capturas
📌 Características
Con Alioli puedes:
🛒 Organizar tu lista de alimentos en despensa, así como tu lista de la compra.
📅 Recibir notificaciones cuando tus productos estén próximos a su fecha de caducidad.
🔍 Escanear el código de barras de los productos para obtener un resumen de su información nutricional.
🥕 Buscar recetas basadas en los alimentos de tu despensa, entre otros criterios de búsqueda como nombre de la receta o categoría a la que pertenecen.
🔧 Aplicar multitud de filtros a las búsquedas, clasificándolas por veganas, vegetarianas, tiempo de preparación, mejor valoración o existencia de vídeos entre otros filtros.
📚 Crear tus propias listas de recetas personalizadas.
⬆️ Subir tus propias recetas a la plataforma para que puedan ser accesibles por todo el mundo.
NOTE: The ones with * after the links are ones that are vetted. If you use your uc email and tell them your a cyber student, they wil mostly likely give you access.
The reason why ARCHFLAGS needs to be specified is due to Apple’s bugs in Xcode12.
It is recommended to explicitly specify the resolver options until pip version 20.3.
Prepare .env and .env.gpg
Write the API Key to .env and encrypt it.
Keep your passphrase in a secure location like YubiKey.
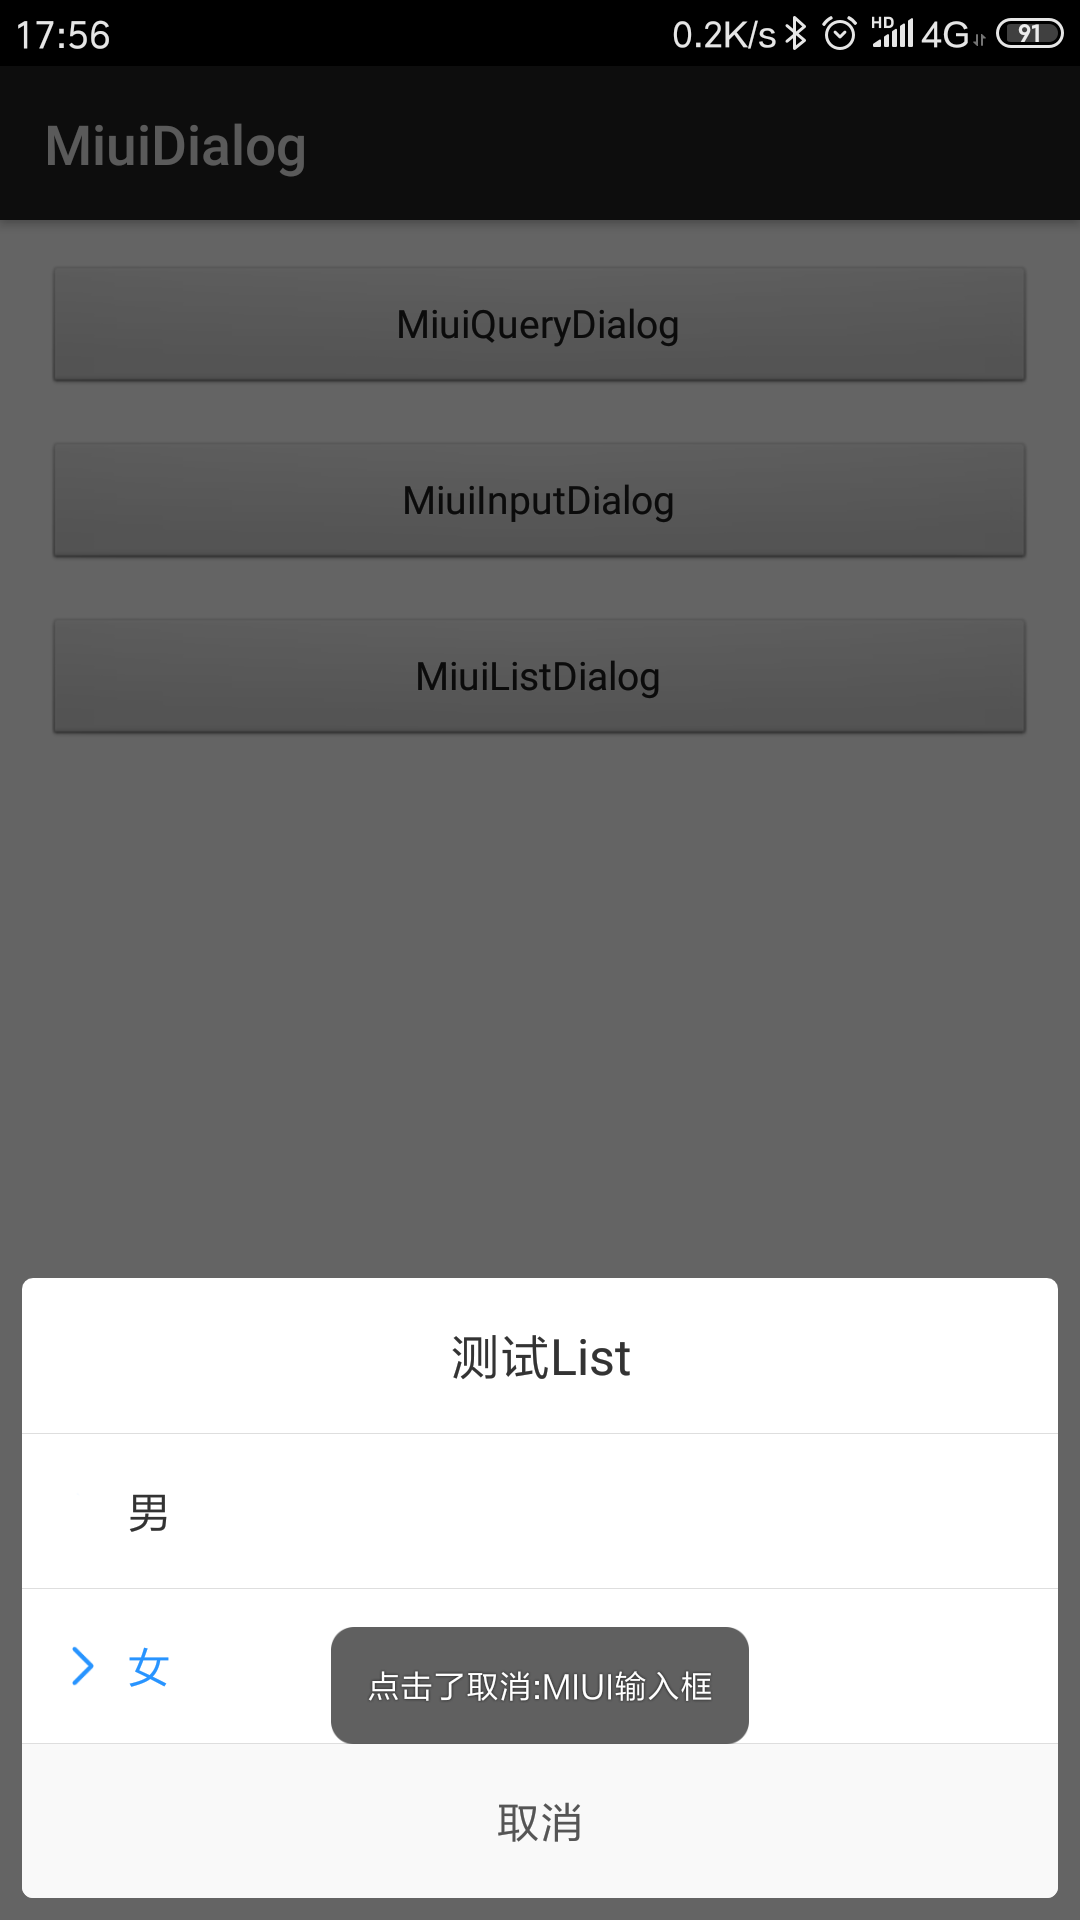
ArrayList<String> arrayList = new ArrayList<>();
arrayList.add("男");
arrayList.add("女");
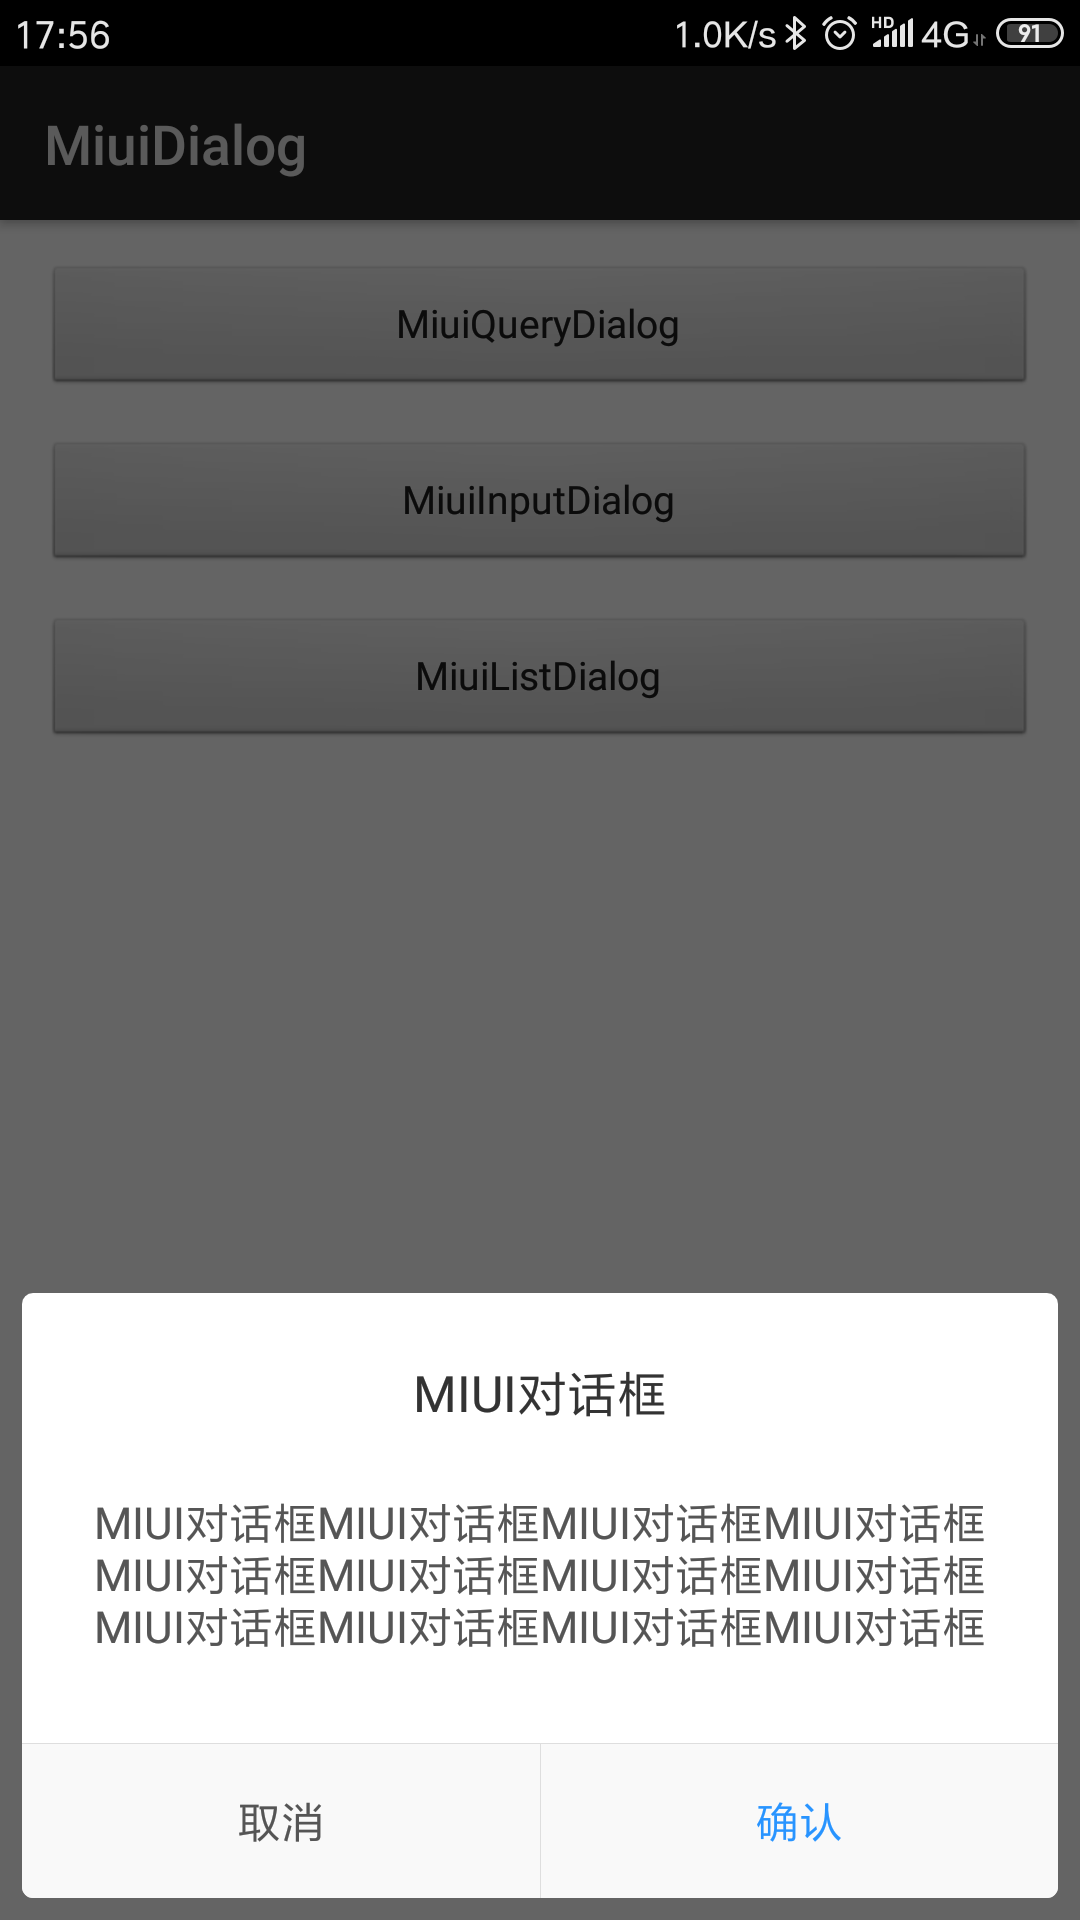
new MiuiListDialog.Builder(this)
.setCancelable(false)//是否点击外部消失
.setTitle("测试List")//标题
.setList(arrayList)//列表数组
.setSelector(1)//选中项,不可大于数组
.setListListener((position, content) -> Toast.makeText(MainActivity.this, "点击了选项:" + position + content, Toast.LENGTH_LONG).show())//点击列表项监听
.setPositiveButton("取消", (position, content) -> Toast.makeText(MainActivity.this, "点击了取消:" + position + content, Toast.LENGTH_LONG).show())//按钮
.show()//显示
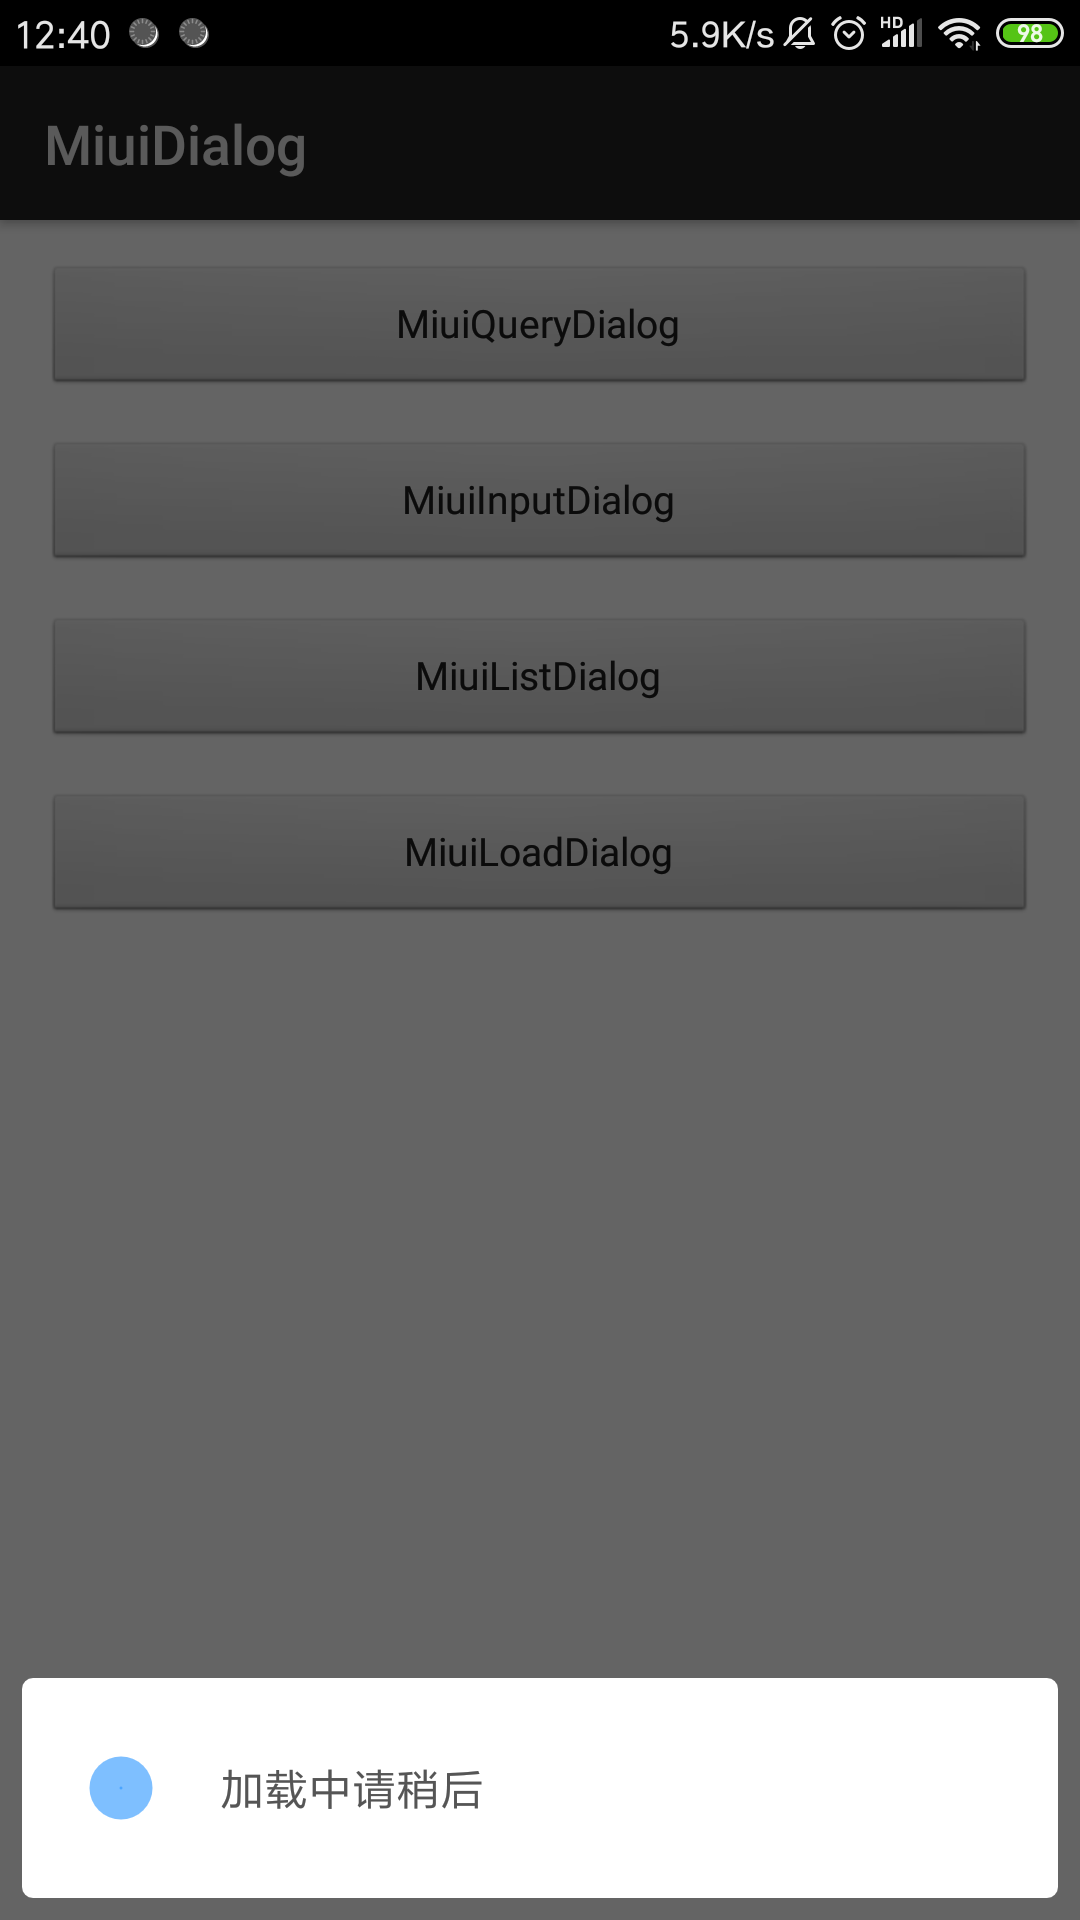
进度框
new MiuiLoadDialog.Builder(this)
    .setCancelable(false)//是否点击外部消失
    .setContent("加载中")//内容
    .show()//显示
Licenses
Copyright 2018 oyo775881

Licensed under the Apache License, Version 2.0 (the "License");
you may not use this file except in compliance with the License.
You may obtain a copy of the License at

    http://www.apache.org/licenses/LICENSE-2.0

Unless required by applicable law or agreed to in writing, software
distributed under the License is distributed on an "AS IS" BASIS,
WITHOUT WARRANTIES OR CONDITIONS OF ANY KIND, either express or implied.
See the License for the specific language governing permissions and
limitations under the License.
This repository provides a simple integration between Paperpile and Notion using the new Notion API. The purpose is to make it easy to periodically sync a list of papers in Paperpile to a Notion database.
This is a work in progress, and is currently intended for personal use only (no support, no warranty, no liability, etc.).
New: The WIP script download_paperpile_folder.py provides an automated way to download a folder from a Paperpile account. This script uses Chromium and Selenium, so the chrome drivers must be placed under the path to make it work. Check the args for more information.
Installation
Simply clone the repo locally and install the dependencies, preferably in a virtualenv:
To run the script, you will need the following things:
A CSV file exported from Paperpile containing the list of papers and their metadata. data.csv is an example of an exported CSV. For now, this needs to be manually downloaded and moved to this folder since Paperpile does not provide any API for exporting data.
A configuration file to map categories, journals and conferences to their acronyms. config.yaml is an example of a configuration file containing major AI and NLP conferences and journals.
A database id for the Notion database you want to sync to. To retrieve the database id, follow the directions provided here. The current structure for the database must contain at least the following columns:
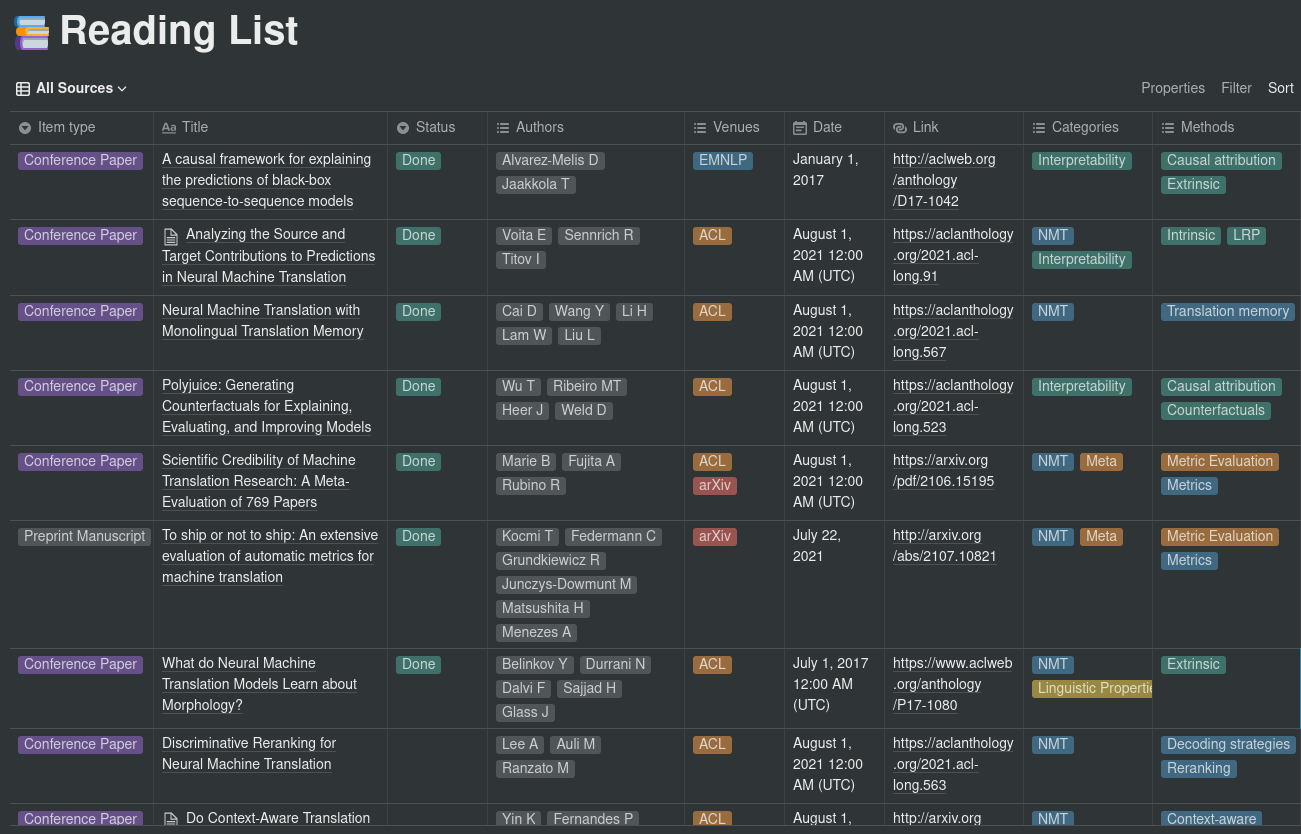
Item type ( select ): Corresponds to the Item type field in the Paperpile export (e.g. Conference Paper, Journal Article, etc.).
Title ( title ): The title of the paper.
Status ( select ): Set to Done when the paper was read, empty otherwise. Can take other values. Managed by using a “Read” and a “To Read” folder inside Papepile.
Authors ( multi_select ): The paper’s authors. Corresponds to the Authors field in the Paperpile export, with only lastnames and first letter of firstnames.
Venues ( multi_select ): The venues in which the paper was published. Based on the config sections for mapping names to acronyms. Multiselect to specify e.g. conference + arXiv.
Date ( date ): The date the paper was published.
Link ( url ): Link to the paper. If multiple links are available, arXiv links are preferred.
Categories ( multi_select ): The categories the paper belongs to. Define the macro-fields to which the paper belongs. These are extracted from the labels that were assigned to the paper on Paperpile.
Methods ( multi_select ): The methods and aspects investigated in the paper. Can be whatever, from architectures (e.g. CNN, Transformer) to sub-topics. On Paperpile, these correspond to labels having the following format: category_shortname - method_name (e.g. Probing tasks for interpretability research could be INT - Probing). Refer to the CSV file for an example.
A Notion API key. To retrieve the API key, follow the directions provided in the Notion API Getting Started. You will also need to add permission for the integration on the database from the previous point.
Usage
Once everything is in place, simply run the script as:
LLSpy is a python library to facilitate lattice light sheet data
processing. It extends the cudaDeconv binary created in the Betzig lab
at Janelia Research Campus, adding features that auto-detect
experimental parameters from the data folder structure and metadata
(minimizing user input), auto-choose OTFs, perform image corrections and
manipulations, and facilitate file handling. Full(er) documentation
available at http://llspy.readthedocs.io/
There are three ways to use LLSpy:
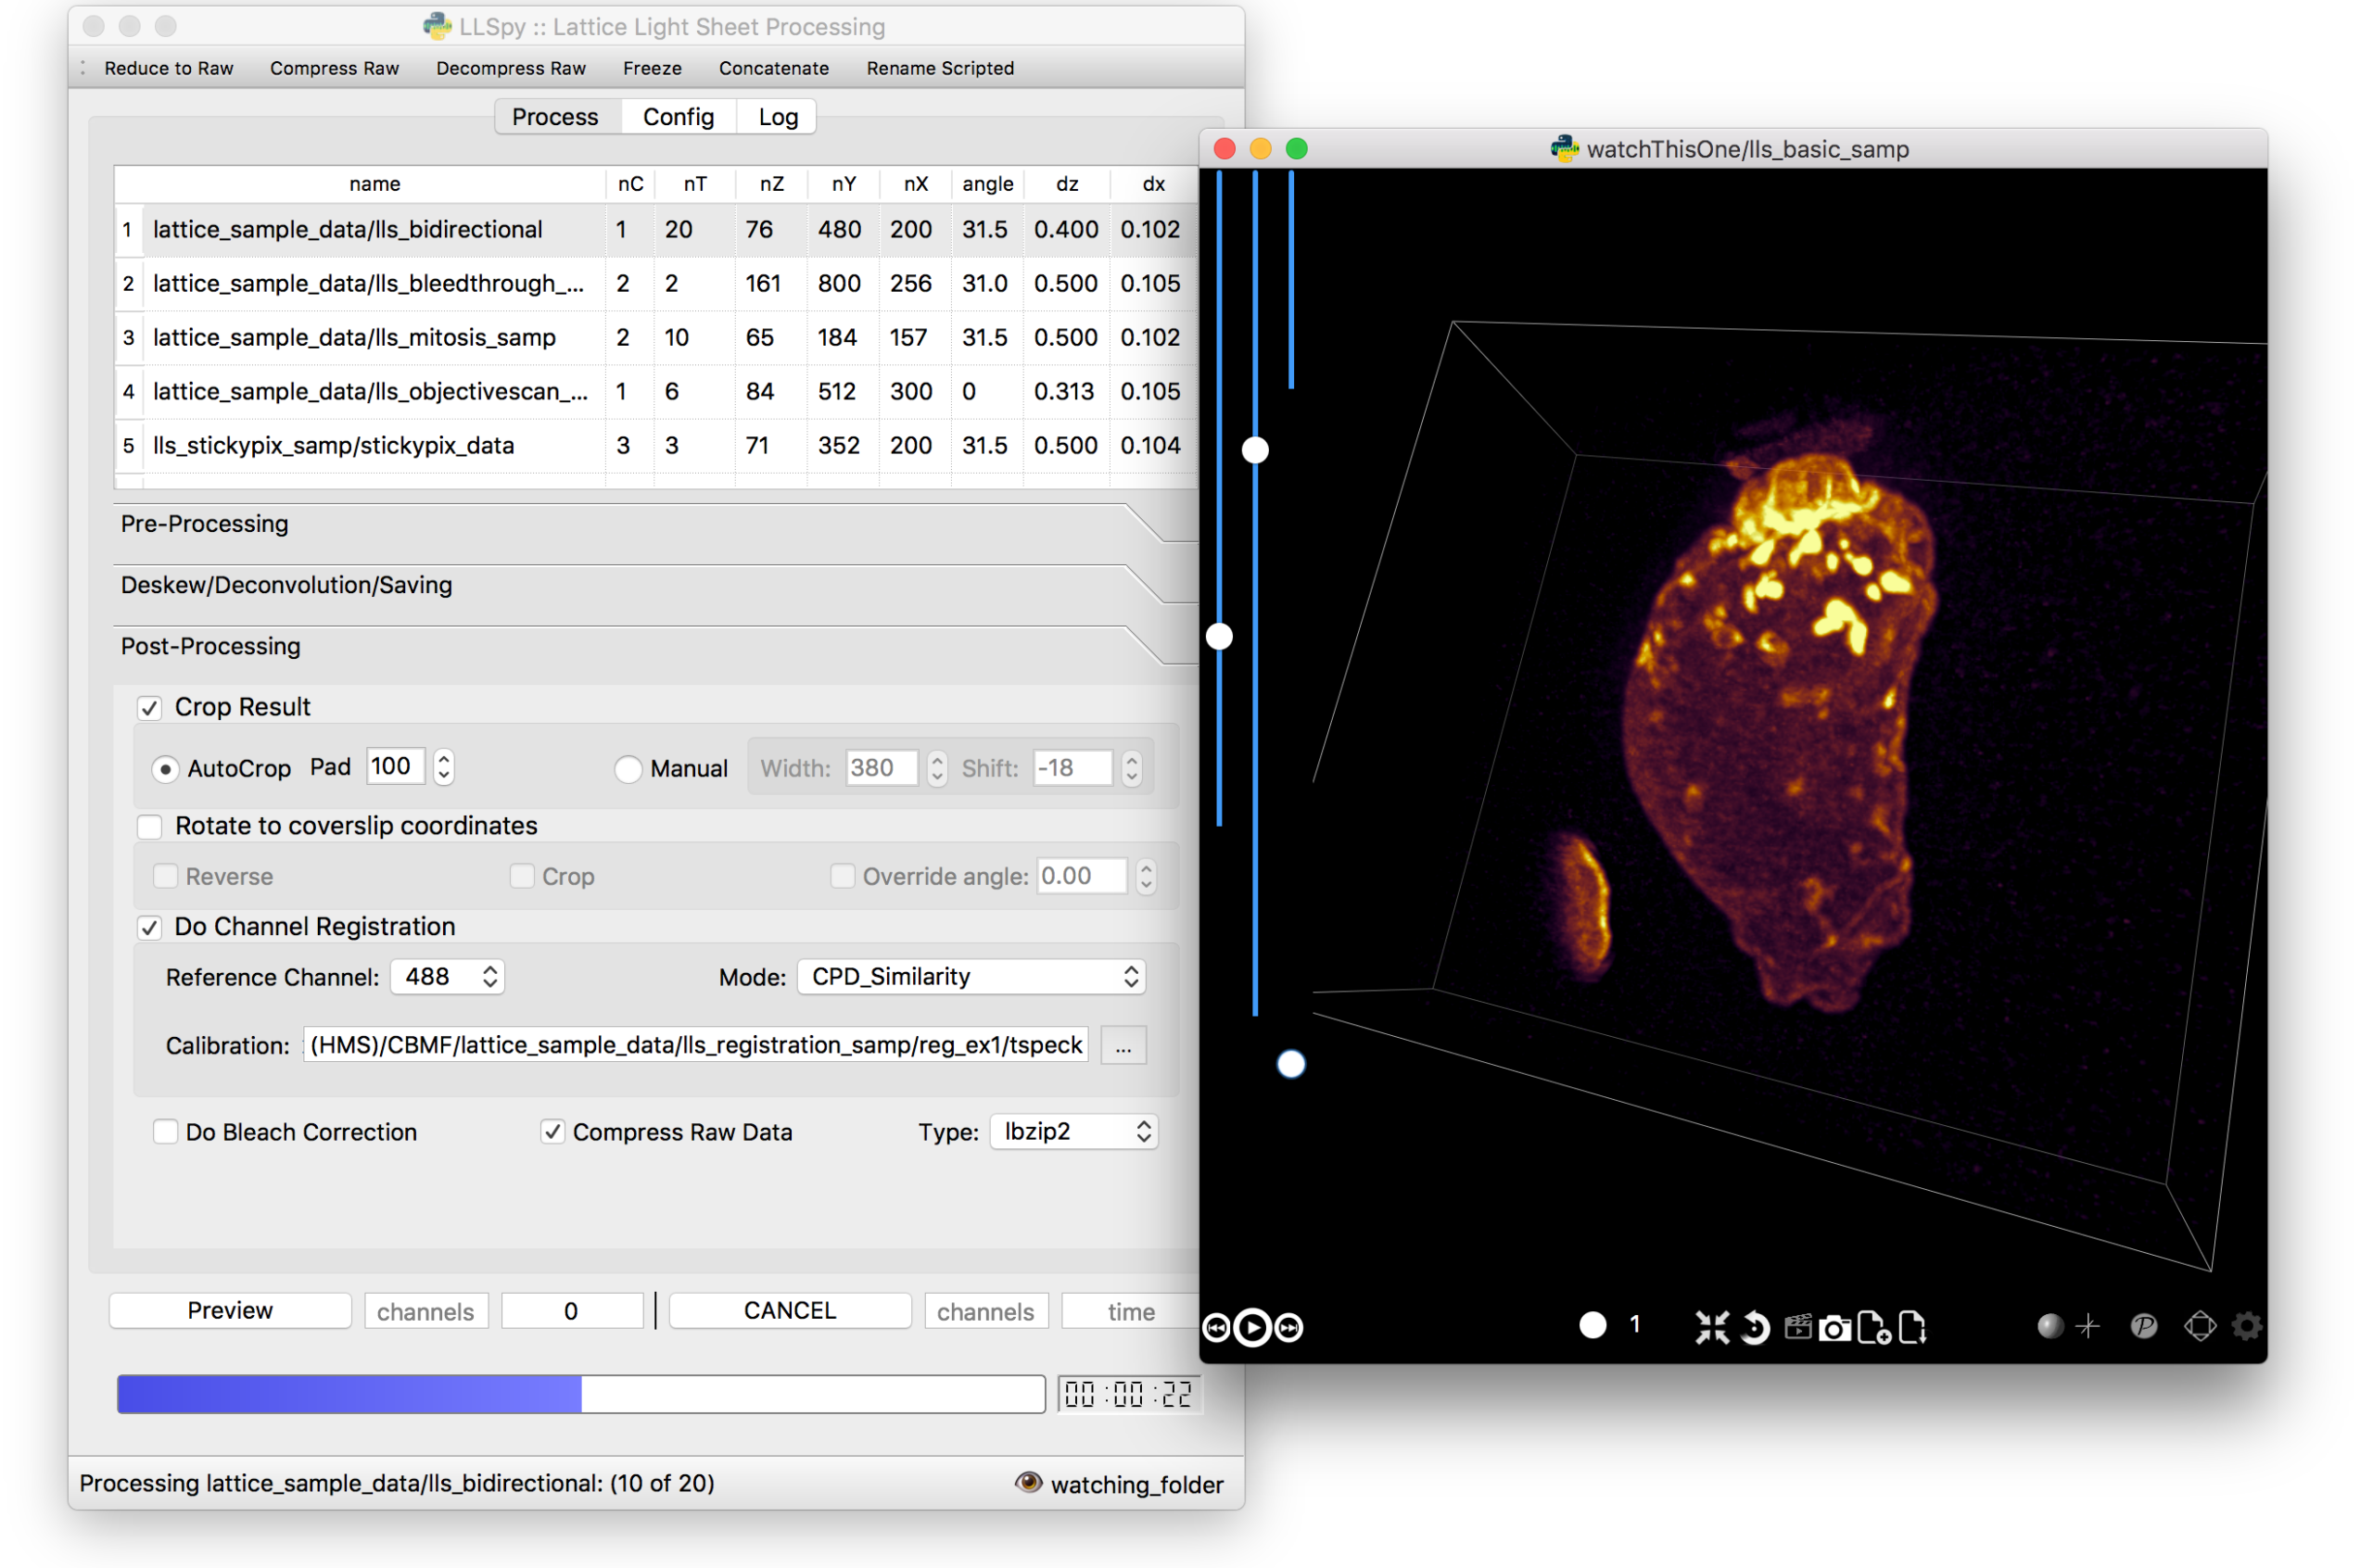
1. Graphical User Interface
The GUI provides access to the majority of functionality in LLSpy. It includes a
drag-and drop queue, visual progress indicator, and the ability to preview data
processed with the current settings using the (awesome) 4D-viewer,
Spimagine,
and experimental support for napari.
2. Command Line Interface
The command line interface can be used to process LLS data in a server
environment (linux compatible).
$ lls --help

Usage: lls [OPTIONS] COMMAND [ARGS]...

  LLSpy

  This is the command line interface for the LLSpy library, to facilitate
  processing of lattice light sheet data using cudaDeconv and other tools.

Options:
  --version          Show the version and exit.
  -c, --config PATH  Config file to use instead of the system config.
  --debug
  -h, --help         Show this message and exit.

Commands:
  camera    Camera correction calibration
  clean     Delete LLSpy logs and preferences
  compress  Compression & decompression of LLSdir
  config    Manipulate the system configuration for LLSpy
  decon     Deskew and deconvolve data in LLSDIR.
  deskew    Deskewing only (no decon) of LLS data
  gui       Launch LLSpy Graphical User Interface
  info      Get info on an LLSDIR.
  install   Install cudaDeconv libraries and binaries
  reg       Channel registration

# process a dataset
$ lls decon --iters 8 --correctFlash /path/to/dataset

# change system or user-specific configuration
$ lls config --set otfDir path/to/PSF_and_OTFs

# or launch the gui
$ lls gui
3. Interactive data processing in a python console
>>>importllspy# the LLSdir object contains most of the useful attributes and# methods for interacting with a data folder containing LLS tiffs>>>E=llspy.LLSdir('path/to/experiment_directory')
# it parses the settings file into a dict:>>>E.settings
{'acq_mode': 'Z stack',
'basename': 'cell1_Settings.txt',
'camera': {'cam2name': '"Disabled"',
'cycle': '0.01130',
'cycleHz': '88.47 Hz',
'exp': '0.01002',
...
}
# many important attributes are in the parameters dict>>>E.parameters
{'angle': 31.5,
'dx': 0.1019,
'dz': 0.5,
'nc': 2,
'nt': 10,
'nz': 65,
'samplescan': True,
...
}
# and provides methods for processing the data>>>E.autoprocess()
# the autoprocess method accepts many options as keyword aruguments# a full list with descriptions can be seen here:>>>llspy.printOptions()
NameDefaultDescription----------------------correctFlashFalsedoFlashresidualcorrectionflashCorrectTargetcpu {"cpu", "cuda", "parallel"} forFlashCornIters10deconvolutionitersmergeMIPsTruedoMIPmergeintosinglefile (decon)
otfDirNonedirectorytolookinforPSFs/OTFstRangeNonetimerangetoprocess (Nonemeansall)
cRangeNonechannelrangetoprocess (Nonemeansall)
... ... ...
# as well as file handling routines>>>E.compress(compression='lbzip2') # compress the raw data into .tar.(bz2|gz)>>>E.decompress() # decompress files for re-processing>>>E.freeze() # delete all processed data and compress raw data for long-term storage.
Note: The LLSpy API is currently unstable (subject to change). Look at
the llspy.llsdir.LLSdir class as a starting point for most of the
useful methods. Minimal documentation available in the docs. Feel free
to fork this project on github and suggest changes or additions.
Requirements
Compatible with Windows (tested on 7/10), Mac or Linux (tested on
Ubuntu 16.04)
Python 3.6 (as of version 0.4.0, support for 2.7 and 3.5 ended)
Most functionality assumes a data folder structure as generated by
the Lattice Scope LabeView acquisition software written by Dan
Milkie in the Betzig lab. If you are using different acquisition
software (such as 3i software), it is likely that you will need to
change the data structure and metadata parsing routines in order to
make use of this software.
Currently, the core deskew/deconvolution processing is based on
cudaDeconv, written by Lin Shao and maintained by Dan Milkie.
cudaDeconv is licensed and distributed by HHMI. It was open-sourced
in Feb 2019, and is available here:
https://github.com/dmilkie/cudaDecon
CudaDeconv requires a CUDA-capable GPU
The Spimagine viewer requires a working OpenCL environment
The create -n llsenv line creates a virtual environment. This is
optional, but recommended as it easier to uninstall cleanly and
prevents conflicts with any other python environments. If
installing into a virtual environment, you must source the
environment before proceeding, and each time before using llspy.
Each time you use the program, you will need to activate the virtual
environment. The main command line interface is lls, and the gui can
be launched with lls gui. You can create a bash script or batch file
to autoload the environment and launch the program if desired.
# Launch Anaconda Prompt and type...
conda activate llsenv

# show the command line interface help menu
lls -h
# process a dataset
lls decon /path/to/dataset
# or launch the gui
lls gui
graphical user interface with persistent/saveable processing
settings
command line interface for remote/server usage (coming)
preview processed image to verify settings prior to processing full
experiment
Pre-processing corrections:
correct “residual electron” issue on Flash4.0 when using
overlap synchronous mode. Includes CUDA and parallel CPU
processing as well as GUI for generation of calibration file.
apply selective median filter to particularly noisy pixels
trim image edges prior to deskewing (helps with CMOS edge row
artifacts)
auto-detect background
Processing:
select subset of acquired images (C or T) for processing
automatic parameter detection based on auto-parsing of
Settings.txt
automatic OTF generation/selection from folder of raw PSF files,
based on date of acquisition, mask used (if entered into
SPIMProject.ini), and wavelength.
graphical progress bar and time estimation
Post-processing:
proper voxel-size metadata embedding (newer version of Cimg)
join MIP files into single hyperstack viewable in ImageJ/Fiji
automatic width/shift selection based on image content (“auto
crop to features”)
Server mode: designate a folder to watch for incoming finished
LLS folders (with Settings.txt file). When new folders are
detected, they are added to the processing queue and the queue
is started if not already in progress.
Acquisition mode: designed to be used on the acquisition
computer. Designate folder to watch for new LLS folders, and
process new files as they arrive. Similar to built in GPU
processing tab in Lattice Scope software, but with the addition
of all the corrections and parameter selection in the GUI.
easily return LLS folder to original (pre-processed) state
compress and decompress folders and subfolders with lbzip2 (not
working on windows)
concatenate two experiments – renaming files with updated relative
timestamps and stack numbers
rename files acquired in script-editor mode with Iter_ in the name
to match standard naming with positions (work in progress)
cross-platform: includes precompiled binaries and shared libraries
that should work on all systems.
CUDA version (type nvcc --version at command line prompt)
Python version (type python --version at command line prompt, with
llsenv conda environment active if applicable)
The most system-dependent component (and the most likely to fail) is the
OpenCL dependency for Spimagine. LLSpy will fall back gracefully to the
built-in Qt-based viewer, but the Spimagine option will be will be
unavailble and grayed out on the config tab in the GUI. Submit an issue
on github for help.